


You may have noticed from my Me-Made-May posts that I've made myself a couple of new wrap cardigans.


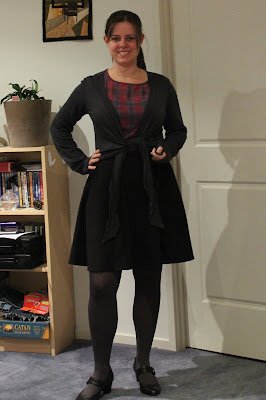
My intention was to copy a black RTW cardigan that I have (pictured on day 9). The cardigan pattern seemed pretty simple, the front pieces were basically just big triangles that wrap around your back, so I had a go at making my own pattern.


I started with my basic t-shirt block, modifying the pieces as follows:
- Shortened the front and back to have the hem sit at my upper hip (in the picture below left I'm indicating my waist with my finger)
- Widened the sleeves so they had a straighter shape and are bigger so they can be worn with another layer underneath
- Made the cross over front by extending the v-neckline down to past the other side seam.


I am intending on putting together a little tutorial of exactly how I did these alterations (particularly the changes to the front piece) and the construction of the cardigan in another post.

I stitched up the pale blue cardigan first, with some jersey that I had lying around in my stash to test out my pattern before making it up in my fancy merino jersey, which is what the grey version is.

After making the blue version and wearing it for a day I was happy with the overall fit, but I decided to lengthen the ties slightly, because I could only just tie them behind my back as they were (see the teeny tiny knot in the above photo). Everything else was great though, and after extending out the tie a couple more inches I cut into my Merino Jersey.


I constructed the pale blue one entirely on my sewing machine, using a combination of the triple-stitch to sew the seams, and a zig-zag around the neck band to hold the layers together. The jersey wasn't going to fray so I didn't finish any of the other seams. I also added clear elastic to the shoulder seam like I do with all my t-shirts.

The grey version was sewn up on a combination of overlocker and sewing machine. I don't currently have an overlocker, I just don't have the space. However Helen very kindly let me use hers at the last social sewing day.

The seams were all stitched using the overlocker, with the sewing machine only being used for the hems around the bottom and on the sleeves.

I know that the sewing machine finish is perfectly strong and will last, but the overlocked one really does look neater inside doesn't it! *sigh* oh to have the space for an overlocker...
Anyway, I am really happy with my new wrap cardigans. Hopefully you like them too and will be interested in the tutorial for making one.
These caught my eye immediately when I looked through your MMMAY post the other day. :-D LOVE them!
ReplyDeleteWow, you're so clever - they look great! Can't wait for a 'how to'!
ReplyDeleteYour lovely wrap cardigans did catch my attention the other day and I am glad you are planning to do a tutorial.
ReplyDeleteI wondered about the super cute wrap cardigans too. Would love to see a tutorial.
ReplyDeleteI was admiring your wrap cardigans.... would love to see a tutorial
ReplyDeleteThese look great Rachel! I feel honoured that my overlocker played a part in making the grey one :)
ReplyDeleteThey both look fabulous, I thought you had made the Coppelia! My overlocker shares my desk space, I just shuffle them around when needed, my desk is only about 60cm x 100cm - it may be possible? Now I want a coverstitch machine, not sure where I would put that!
ReplyDeletethey look wonderful. I don't have the space for an overlocker either :-)
ReplyDeleteThey look great - I love a wrap cardi, so I'm really looking forward to a tutorial!
ReplyDeleteThese. Are. Awesome!
ReplyDeleteI am keen as a mung bean for a tutorial for these, Rach :D
They are gorgeous!
ReplyDeleteI think these look fabulous on you - and I am slowly coming around to the Hollyburn... this black one of yours has a lovely shape.
ReplyDeleteThese must feel wonderful to wear and the shape suits you too.
ReplyDeleteLove them! Well done.
ReplyDelete