

I finished my Cambie Dress, and I love it!
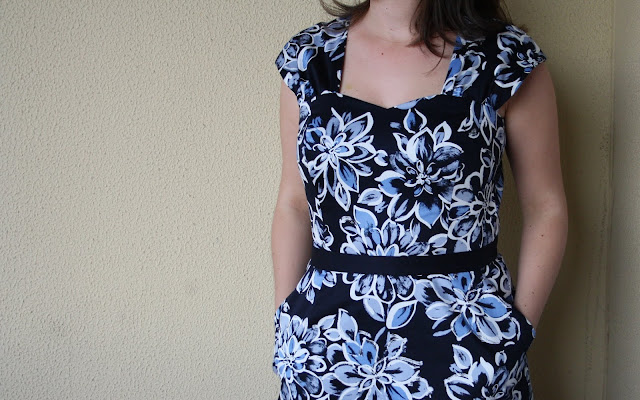
It's tricky to pick my favourite part; the sweetheart neckline, the gathered cap sleeves, the a-line skirt, the pockets... but after careful consideration I think it's the addition of the extra little waistband piece. Since my fabric has some stretch, but the waistband piece is cut so that it doesn't have stretch around the waist it has a nice stabilising effect in a very comfortable dress. Oh, and (I think) it's flattering too.

On top of all those positives about the finished dress, one massive bonus of the pattern itself is how economical it is in terms of fabric usage! As I mentioned before, I had 2.6m of this fabric and I managed to squeeze the pieces into a meager 1.5 metres - pretty good for a dress! (Leaving me a decent size piece left over to make a skirt)

The fabric is a stretch sateen, and I wanted to see if I could find some in a coordinating colour for the waistband - as you can see I found a matching navy (from Clegs).

I used some normal slippery lining fabric to line the skirt.

As I mentioned the other day, despite making a muslin of the bodice there were some fit issues, most likely due to the stretch in my fabric and because I used stretch sateen to line the bodice as well. The bodice was massively gaping through the front neckline.

The fit issues were fixed by extending the stitching line of the darts to convert it into a princess seam. This removed the extra fabric from the neckline. Shown above is the line of stitching I added, you can see the original dart near the top of the photo, and the added line is the curved bit further down. I also shortened the straps slightly at the lower seam.

While I'm pretty sure it was my fabric choices the caused the problems, I'm happy with my choice, as the double layer of stretch sateen gives the bodice a nice structure whilst still being comfortable.
Other than that alteration I didn't deviate from the instructions, which are very clear, and the inside of the zip looks fab! I even took the suggestion from the instructions to sew the waistband down by hand at the end, to make sure it was perfectly lined up. I'm glad I took the time to do that.
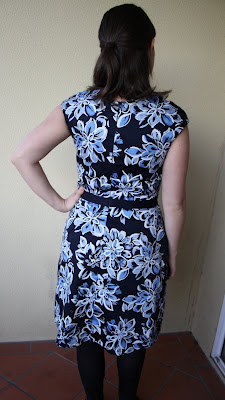

Since the flowers are relatively random I didn't bother matching the print, even on the centre back seam or where the pockets are. I think it still looks pretty good. The only print placing I paid attention to was where the flowers would fall on the bodice front.


Since I had already cut out waistband pieces in the print before I bought the navy solid I decided to use one of the space waistband prints on the inside - nobody will see it but it makes me smile. It also makes me think that this dress would look pretty awesome in a solid with a contrast waistband!


So in summary of a particularly picture heavy post - I love this dress! I definitely need quite a few more!

(Thanks Misaya for taking the photos!)
Rachel, this dress is great, I love the fit and the choice of fabric. x
ReplyDeleteIt's gorgeous! I need to make one..... You have to make more! Great length too. Got your next fabric picked out?
ReplyDeleteLooks really awesome Rachel! - Kelly.
ReplyDeleteHoorah for blue Cambies!
ReplyDeleteThe dress looks wonderful! You are so clever Rachel!
ReplyDeleteThis is so PRETTY, well done Rachel!
ReplyDeleteIt is so lovely. Great job.
ReplyDeleteI love it! Need to get onto my own. :)
ReplyDeleteI'm so impressed by the workmanship. It looks fantastic on.
ReplyDeleteAwesome job Rachel! :)
ReplyDeleteYour Cambie looks great! Isn't this an awesome pattern? I love it.
ReplyDeleteThis is gorgeous! It looks so beautifully made inside and out. I can't wait to come to Melbourne and buy pretty fabric. Seems like you have all the best stores down there!! This style dress really suits you its so pretty!!
ReplyDeleteThis is fabulous! Love the waistband detail...(better late than never to comment right lol)
ReplyDelete