Saturday, August 31, 2013

Of awesome meet-ups and new fabric

Before it gets ridiculously late to write about this, I wanted to put together a quick post about the awesome meet-ups and fabric shopping that happened on my recent jaunt to Europe, and even more recent trip to Queensland.

First up my trip to Europe. While I was there, on a drizzly afternoon in Birmingham I met up with the lovely Sabs for a little bit of fabric shopping (more about that later) and lots and lots of gossiping. It was a very enjoyable afternoon, although I'm a little worried that I talked a bit too much, as I had a sore throat afterwards! Sabs kindly showed me her favourite fabric haunts in the centre of Birmingham (although we had unfortunately scheduled our meet-up on a day the markets were closed), and as well as the pieces of fabric I purchased I came home with a lovely piece that Sabs very generously gifted to me.

Me and Sabs
Next up was the enormous and overwhelming meet-up in London, on Goldhawk Road to be exact. There was a massive 35+ people that came along to the meet-up, which in all honesty was a little overwhelming. I only managed to speak to a handful of people.


We gathered outside the tube station, and then split into groups to hit the shops all along Goldhawk Road. After that we all went to 'Liz Cafe' for lunch, where the staff were incredibly accommodating to our massive group. And after lunch there was the swap to beat all swaps. Wow everybody had brought stuff to swap! There was a massive table of fabric, another of notions and another of patterns.


It was an amazing day, and sadly I didn't actually get any photos of me with any of the fabulous ladies that I met. However, here's one I've stolen from Roisin of me with Emmie, Alison, RoisinVicki Kate, and Amy:

(Pic stolen from Roisin)
I'm sure by now you're just wanting me to get on with it and tell you about the fabric. Ok, ok, I shall oblidge...


This is the almost embarrassingly large stack of fabrics that came home with me from our holiday. From the top:
- Gorgeous almost Liberty style lawn from Macclesfield
- The lovely fabric gifted to me from Sabs
- Green floral chiffon from Birmingham
- Origami cranes chiffon from Birmingham
- Rayon from Birmingham
- The softest voile in the world from Paris
- Another lovely voile from Paris
- Some Liberty Lawn that I got in the London Swap(!!!!)
- Some Liberty Lawn bought on Goldhawk Road
- A stretch sateen from Goldhawk Road (I went halves with Roisin as it only came in 5m pieces)
- An unknown but very soft fabric from the London Swap
- A purple floral voile from Goldhawk Road
- HOT AIR BALLOONS! Poplin from Goldhawk Road
- Some Jersey from the London Swap
- Some textured suiting from the London Swap

It's a really good job that I'd taken across three quilts, so had that space spare in our bags and just about squeezed everything in.

I also mentioned a trip to Queensland at the beginning of the post. I went up to Brisbane for the weekend to see the Quilts 1700-1945 exhibition (which was really interesting, well worth the trip if you're in the area) and see my Gran. However while I was there I met up for afternoon tea with the three lovely ladies pictured below:

Steph, Myself, Liz and Reana-Louise
I had a great afternoon, and the conversation just didn't stop until it was time to go home... and even then it didn't stop as Liz and I ended up going out for dinner too since we still had heaps to chat about.

So that's the wrap-up of the meet-ups I've been to in the last month or so. And I can't believe it's only a week until Frocktails, where I will be joining about 30 other sewcialists for some delicious dinner, yummy cocktails and beautiful frocks. I can't wait!!!

Monday, August 26, 2013

One Pattern Seven Bloggers - Revisited - Inspiration


The reception to our revisit of the one pattern seven bloggers idea has been a little overwhelming. Thanks to everyone that stopped by and commented on the post last week. Remember that the giveaway is still open, so head on over to that post and comment before the 31st of August to be in for a chance of winning one of the 8 prizes.

Today I'm going to talk a little about the inspiration for my dress...

As soon as the Macaron pattern was chosen I knew that I wanted to make a lace dress. Working with lace has been on my wish list for a while now, I was just waiting for the right inspiration for it, and I decided that this is it. I would be guilty of a massive omission if I didn't say I was heavily influenced by Liz's gorgeous lace Macaron in deciding that this would be a good project to try lace with. You can see all the details of her dress, pictured below, here.

The last added bonus to choosing to use lace, was that I decided that my Macaron could hopefully become my dress for Frocktails, and I thought lace could make a fantastic cocktail dress.

Liz's Gorgeous Macaron | Source

So, with that in mind I visited a few local stores looking for lace. Originally I was hoping for a nice coloured lace, that I could then put a neutral (probably black) behind. Sadly fabric shopping luck was not with me, and I was really struggling in finding some lace that I liked. Then finally I found this lovely black lace at GJs during a Social Sewing day:


I auditioned quite a few colours for the underlinining, but the sheer number of options was a bit overwhelming for my poor little indecisive self. Thankfully the lovely social sewing ladies were happy to weigh in with opinions on which to choose, and this olive green colour won, almost unanimously.

So that's my inspiration and fabric choices for my dress. Be sure to tune in next Monday to see the finished thing, and check out the blogs of the other ladies to see what their inspiration is:

Saturday, August 24, 2013

What Was Your First - Steph from SewingCake

Things got away from me and before I knew it 4 months had passed since I introduced this series, whoops! Sorry about that. Let's try again and this time get things rolling a bit more regularly. Today we are lucky enough to hear about Steph, the talented lady behind SewingCake Patterns, and her first...
Steph resting in one of her hummingbirds | Source
First, introductions: 
I'm StephC from 3 Hours Past the Edge of the World, creator of Cake Patterns. I've been sewing as long as I can remember, I started out making clothes for my dolls and costumes to supplement my imagination. I would say I'm an advanced sewist.

What was the first "real" garment you sewed? 
The first "real" garment I sewed was a sleeveless rayon bias sheath when I was 12 or so. It was awful! My mom bought me a sewing machine but neither of us knew how to use it. I was undeterred. The fabric was a butter yellow color, sprinkled with blue irises. Grown-up me knows to avoid yellow, but tweenie me loved the color. I wore it to church, very pleased with my new make. A kind older lady pulled me aside and whispered in my ear "You have to put down the presser foot before you sew, it will make much neater stitches that way." This tip revolutionized my sewing. She came by and taught me a few basics about using my machine- winding bobbins, backstitching, etc. I don't know why I started sewing, it's a compulsion. No, I don't still have that yellow dress, definitely don't wear it. I'm not sure what happened to her- I never wore her again once I realized what a mess I made of the stitching!

If you were making it now, what would you do differently? Would you remake the garment now? 
No, I don't think I would remake that dress because I don't wear that cut (bias sheath), I don't wear that color (yellow) and I don't wear much rayon. I had zero clue how to dress myself when I was 12!

If you could go back in time and tell past-you one tip to improve your early garments, what would it be?
Learn to put in a zipper nicely before your early 20's. It's ridiculous the things you do to avoid putting in a zipper, and it's not that hard! You could learn in 20 minutes if you weren't strangely scared of your machine, the zipper, and the fabric. What they ever do to you? Nothing. So get cracking, time's a-wasting.
Tip: Invisibles are simplest to learn.

Thanks Steph! Stay tuned for the next post in this series, hopefully a little sooner than this one was after the last one ;)

Thursday, August 22, 2013

Ruth's Quilt - Design Process

The other day when I showed you the quilt that I made for Ruth and Jon I promised to talk about the process I went through designing the quilt. With the quilts that I've made, I've rarely used a pattern, or when I have I've usually tweaked it for my requirements.

With this quilt I had some vague ideas of what I wanted to include but needed to decide how the whole thing would fit together. I knew I wanted it to be a 'medallion' style quilt (with successive borders as you go out from the centre), and I wanted to include dresdens, as I thought they would fit well with the style of fabrics I'd chosen. Other than that I wasn't sure.

I started by grabbing some paper, a pencil and some coloured pencils and started sketching out ideas. The first idea that I came up with that I was vaguely happy with is shown below. It heavily features the dresden plates, including some going around the outside of one of the inner borders.


I wasn't completely happy with the composition of this design though (it didn't feel quite right on the required rectangle for the quilt to go on a bed), and somebody on Twitter (Lizzy I think) suggested putting one of the borders on point:

Sketching up this idea it came together quite quickly. Adding a diamond shaped border around a larger central dresden along with some other rectangular borders. I liked the original large striped border for the outer border as I really liked that (with the intent that these stripes will be the parts that hang down the sides of the bed) so planned on keeping it, so just redesigned inside of that border.


However I kept coming up with ideas for what could go in those triangles around the diamond border. So I sketched out my various ideas on little cut out pieces of paper the size of that triangle, and in the end decided that of all the options I preferred the smaller dresdens as full circles centred (as much as is possible in the shape) in the triangle.


But for some reason (that I don't understand now) I was still torn between the two overall designs. After I mentioned this to Darren and he helped me out hugely by mocking up the designs on to little beds. I sent him through pictures of my sketches and very quickly thereafter I received these images back:


The instant that I saw those images I knew that I preferred the one with the inner diamond border, hands down, no competition. However, I wasn't sure if I liked the smaller dresdens anymore, but knew that as they would be appliquéd on I could decide that later on in the construction process.


Now I had my overall design I needed to work out the actual dimensions, and therefore the sizes of the pieces to cut out, and then an order of construction. As I liked the overall proportions from my sketch, I measured up the sketch, then multiplied up the dimensions based on how big I wanted the quilt to be; the width of everything except the outer border should be about the same as the width of the bed, the total height minus one of the outer borders should be the length of the bed (so the top border covers the pillows rather than goes over the edge of the bed like the other three).

Working inwards and dividing/multiplying I worked out how big each of the borders should be, and then individually worked out how big the separate pieces should be. Going into detail of how I did that is a bit complex on here, but once I had the vague measurements I started on the construction. I started with the large white diamond and also the large central dresden. Then I constructed each border as I got to it.


I didn't remember to take a photo of the quilt in it's new home, but above is a (slightly crappy) pic of the quilt top on my bed to show the scale on a bed. However, it looks better on the real bed as UK beds are slightly different sizes to Australian ones, and my bed is lower than where it actually lives.

Monday, August 19, 2013

One Pattern Seven Bloggers - Revisited (+Giveaway!)

Back in May of 2011 I was lucky enough to be part of a fun little project called One Pattern Seven Bloggers, where myself and 6 other fabulous sewing bloggers all made a dress from the same pattern. I'm very excited to be able to share with you today that we have decided to repeat the project, with the same group of 7 bloggers and a different pattern.


I'm very excited about this project, as in addition to the fact that my last one pattern seven bloggers dress was a massive success and is still in heavy rotation in my wardrobe, it's been great to be working on a project with such inspiring ladies once again.

As a reminder the 6 other talented sewists are:
Another incredibly exciting thing is that this time around we are able to offer a huge giveaway thanks to a group of amazing sponsors!


The Prizes
1 x Macaron Pattern thanks to Colette Patterns 
1 x Macaron Pattern thanks to Guthrie & Ghani 
1 x Macaron Pattern thanks to Stitch 56 
1 x Pattern of your choice thanks to Sew Squirrel 
1 x Colette Pattern of your choice thanks to Indie Stitches 
1 x Colette Pattern of your choice thanks to The Haby Goddess 
1 x $20 gift voucher thanks to Fabric Worm 
1 x $30 gift voucher thanks to A Fashionable Stitch 

To enter, all you need to do is comment on this post before Saturday 31st August with your email address!
Make sure you head on over to all of the other participants blogs for up to 7 chances to win!

Terms & Conditions 
  • Prizes will be randomly allocated to each of the 8 winners across all seven blogs. 
  • One entry per blog. You can comment on each of the 7 blogs for 7 chances to win (!). 
  • The winners will be drawn and contacted by email on the 2nd September 2013.

So, keep an eye out on the blogs of the other ladies over the next day to see their announcement posts, and remember that you can comment once on each blog for up to 7 chances to win one of the giveaway prizes.

Also remember to come back on the 26th of August for Inspiration posts and then on the 2nd of September for the big reveal!

EDIT - the giveaway is now closed. Thanks everyone for entering.

Tuesday, August 13, 2013

A Wedding Quilt for Ruth


I took three quilts with me on my trip. I've shown you the two baby quilts (here and here), and this is the last quilt I took; a full sized quilt that was a wedding gift for my darling friend Ruth and her now-husband Jon, whose wedding was the reason for my trip.


I bought half of the fabrics last August almost straight after my last trip to the UK. I knew exactly what kinds of fabrics I wanted to get; florals and spots in pastels pink, blue, green and yellow. And it was very easy to get that. Throw in a few other fillers (Some cute gingham etc) and I think I got a pretty good selection going.


The fabrics then sat on my shelf for aaaages waiting for inspiration. Then in Feb I decided that I really needed to get around to actually designing something and starting to make it, or it wouldn't be finished in time to take with me.


At about the same time I also decided that the original bundle of fabrics I'd bought didn't quite offer enough variety for the type of design I was going for, so went out and bought some more. I ended up buying about as many again (and some of those new fabrics are some of my favourites!) and as such have once again got lots left over. I don't mind though, as I think it really made a difference to the look of the quilt.


I'll discuss the design process of the quilt in another post, so jumping through the design and piecing to the quilting... most of the quilt I decided to just echo the stitching lines 1/4" from the seams, but added some radiating lines out from the centre of the central dresden, and in the negative space of the large white triangles added some quilted dresdens. I didn't want to add too much as I was really happy with the effect of the piecing, but I'm happy with the effect I got.


I have already had the pleasure of sleeping under this quilt since it was gifted - it was always intended to live on their spare bed and since we stayed with them after the wedding this quilt was already on the spare bed. (Meaning that I actually got to sleep under two of my gifted quilts on my holiday, as I also got to sleep under Laura's while visiting her on this trip too).

Sunday, August 11, 2013

A Quilt for Baby Kyle


Well done to those that correctly guessed the location for the pictures of Oscars quilt in that post; those photos, and these ones were taken at the amazing Chatsworth House (which was used as Pemberly in the 2005 Pride and Prejudice).


Today I get to share some more pictures of the beautiful house and gardens under the guise of showing you another baby quilt; this one was a gift for baby Kyle. I really hope that Kyle uses and loves this quilt as much as his big sister does her quilt.


I absolutely love the fabrics I used, a combination of ants and woodpeckers, and some 'filler' fabrics (mostly variations on spots and stripes, as that's my MO, fabrics shown here). I showed you this quilt top last September, but only quilted it more recently. I made a basic design where I cut each fabric into two strips and one square, and pieced the square into a random spot cut in the strips.


The back is a blue version of the grey ant fabric on the front of the quilt. To keep the simplicity, I then quilted the quilt with straight lines about 1/4 inch away from each of the seam lines. Lastly, the quilt was bound with a darker grey to frame the quilt.


Thursday, August 8, 2013

Social Sewing - Reminder for August


Woohoo, now I'm back in the country I can go to this month's Social Sewing  The next Social Sewing is just over a week away, on Saturday the 18th of August.

You know the deal now, all the details for this social sewing all the details for this month and future months are available on the Social Sewing Page linked at the top of my blog.

Can you please let me know if you're planning on coming by commenting on this post. Thanks in advance!

I'm looking forward to seeing you all again! (And any new faces of course, new faces are welcome too)

Wednesday, August 7, 2013

A Quilt for Baby Oscar


Now I'm back from my holiday (which was awesome by the way!) normal blog posting shall resume. First up are a few quilts that I made and took with me as gifts for a few special people. The first one I want to share is a baby quilt made for the new son of my dear friend Helen.


When hanging out with slightly pregnant Helen when I was in the UK a year ago, I asked her if she'd like/use a baby quilt, and following a very positive response to that question I delved a little deeper and established that she: a) doesn't like muted colours, instead preferring bright colours and b) likes elephants.


Very frustratingly, when I was shopping for fabrics for this quilt there were no fabrics with elephants that I liked. So plan B was to make my own elephant!

Big props must go to Darren (aka "The Boy") for sharing his photoshop skills in helping me with the elephant outline, as I had a photo of an elephant I'd previously embroidered that I wanted to use, but didn't have a front on picture, so it required some minor manipulation.


The main background of the quilt top is a (really quite big) disappearing-nine-patch, which was a super quick and easy design to do! It only took me a couple of hours to cut out, stitch up, cut up, and stitch up the whole of the quilt-top excluding the appliqué. The elephant was then appliquéd on with a zig-zag stitched, and the top free-motion quilted with a big stipple design (which I'm still practising getting a good 'big' stipple).


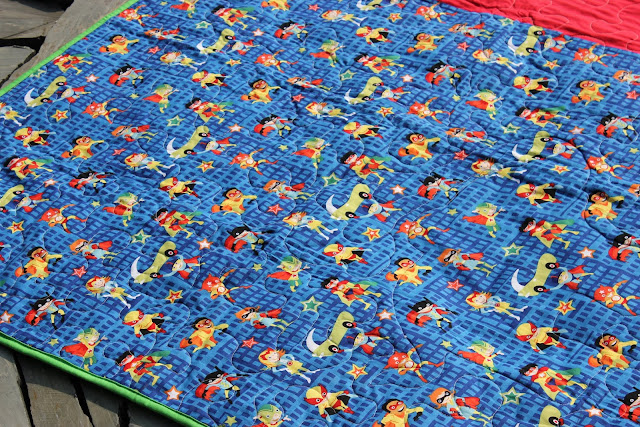
I'm madly in love with the fabric I got for the back of the quilt - SUPERHEROES!!! How amazing is the fabric!!

And look, I've already been provided with proof that it's already had some nap-time action. Hopefully it'll get plenty more use as Oscar grows up.


Bonus points if you have recognised the incredibly picturesque backdrop where these pictures were taken. 
Related Posts Plugin for WordPress, Blogger...