Saturday, March 30, 2013

Portrait Dress


You know when you read somebody using the phrase 'whipped up' a garment? Is it just me that frequently thinks "whipped up? come on, clothes aren't generally whipped up! There's more work involved than that!"? Well, as much as I fear using the phrase myself, I really did 'whip up' this dress this week. I mean, two pieces and some bias binding, there's really not that much to it.


When making up my second portrait blouse a few weeks ago, I couldn't help but think about how the blouse would work lengthened into a dress. So this week, when I had some spare time, I had a go at extending the portrait blouse pattern into a dress.

Most of my summer dresses are of the fitted bodice, full skirt variety, which don't get me wrong, I love. However, when it's really hot and you just want something to lounge around in, you don't really want to be wearing a fitted bodice! So, the intent is that this will fill that gap in my summer wardrobe. (I know, I know, summer is over, whatever! It was still hot when I started this... but colder when I finished. It's Melbourne, you never know, the heat could come back!)


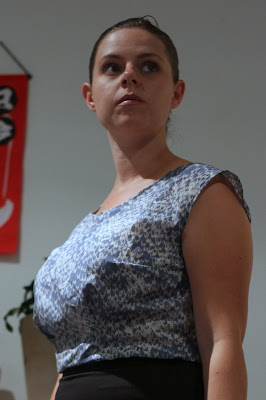
To convert the pattern into a dress, I taped some extra fabric to the bottom and extended the side seams out at an angle similar to the edge below the waist already. Also, knowing that I have quite a, shall we say, developed derrière, I pivoted the centre back seam so that it was the same size at the neckline, but about 2" extra at the centre back at the hipline (well 4" as it is on the fold). I measured the blouse and my measurements to make sure that there was plenty of ease through the hips and cut it out!


When sewn up the only real change I made was altering the back tucks - I made them bigger than they were originally  (about 3 times the size) to bring the fabric in across my lower back. This was necessary because of the extra fabric I had added by pivoting the centre back seam out. Now it's finished though, I think the back tucks are stitched a little long, and I'm planning on unpicking the bottom inch of them to let them finish slightly higher up. I hemmed it a couple of inches above the knee, to make it long enough not to flash people when bending over and such, but short enough not to be frumpy.


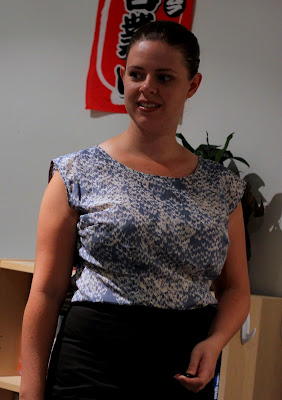
The fabric that I used is a lightweight sateen from spotlight, one of a whole host of matching spots I bought about 2 years ago. (This actual fabric is actually also in my 'seeing spots' quilt, which is about half quilted and patiently waiting to be finished, but I bought extra, always with the intent to make a dress with it).


While my other two portrait blouses were finished with self bias binding on the inside, I knew as soon as I tried on this dress mid-construction that I needed to find some green fabric that matched the green spots in the print.

I found this green at GJs, it's actually a quilting cotton, which I'm normally very cautious of using in garments, but as it was the PERFECT colour I decided to risk it. I am very surprised at how well it worked out actually! I loosely followed this tutorial, and am really happy with how it's sitting. Also, I used a topstitching foot when doing the topstitching on the binding, and am absolutely thrilled at how well it turned out!


Overall I'm incredibly happy with this dress. If I were to make another one I think I might curve the skirt side seams a bit to make it a tiny bit strighter and less a-line, but other than that so far I'm loving it!

Wednesday, March 27, 2013

SewcieTea Practice Dress #2


Do you remember the first practice version of my SewcieTea dress? With some minor modifications I've sewn up another practice version. This one is made from a lightweight cotton sateen that I bought at Spotlight in December, with some black poplin from GJs for the contrast sections.


The biggest change to this version is the addition of a solid facing (of sorts) on the outside of the neckline, and an added waistband piece (also in solid).


After getting grumpy that my last version didn't have any pockets, I added an in-seam pocket to this version. Only one though, as I couldn't be bothered to faff around putting one in the same side as the zip.


Because of the added neckline facing I had to modify the order of construction so that the shoulder seams were sewn first rather than towards the end. I'm really happy with the finish that I got, and as I didn't find anything about this kind of finish when hunting on the web thought I might put together a tutorial on how I did it when I sew up my final version. Is there any interest for that?


The other minor changes in this version were making the armholes slightly larger, and adding some extra length to the front (but not back) of the bodice to make the waistline/waistband sit level on my waist.


Obviously, since it has another circle skirt, obligatory twirling shots ;)


I'm happy enough with this version that (I think) I'm ready to move onto the actual thing and cut into the liberty over the Easter weekend. I'm still a bit scared, but I need to bite the bullet and get on with it.


Wish me luck!

Monday, March 25, 2013

A Quilt for Ginger

Today I have little story of secrecy and subterfuge, involving 5 sewcialists and a baby quilt.


Once upon a time there was a young lady called Kat, who is currently excitedly expecting her first child, a baby boy, currently nicknamed 'Ginger'. Kat is friends with a group of lovely young ladies that all go to Social Sewing together; Melanie, Sarah, Belinda and Rachel (me).

One day, on the twitters, Kat makes a cheeky request for Rachel to make Ginger a quilt. Rachel responds that she'd be happy to make a quilt with Kat, and Melanie and Belinda pipe up that they'd like to have a go at quilting too.

Following this conversation, the girls, excluding Kat, decide to band together and make a quilt for Ginger as a surprise for Kat. Emails were exchanged, plans were made and a fat quarter bundle of 'Out To Sea' fabric was ordered:


The four ladies met up on a (very hot) public holiday for a day of quilt sewing (and eating delicious noms provided by Melanie's beau, see evidence below):


The BBC Pride and Prejudice (1995) was put on in the background, and they discussed different options for the quilt layout, settling on a 5" base 'unit' and creation of various blocks sized for that unit. After making up a few blocks extra pieces of fabric were cut to fill in the gaps:


And the quilt top was stitched together,


basted,


quilted and bound.


Then, on Saturday Kat had a baby shower, and the surprise was revealed:


And we hope that she loves it! (Sadly Melanie couldn't be there for the gifting as she had a lovely weekend away already booked in, so sadly isn't in the picture below).


The End.

Congratulations and Best Wishes Kat! I'm so incredibly excited for you, and wish you, Ben and Ginger all the best xxx


Some more information about the quilt...

We quilted the quilt 1/4" away from some of the seams, making sure the quilting was at minimum 8-10" apart as specified by the batting. The batting was the polyester batting from GJs (I'm pretty sure, it was some I had stashed away in my wardrobe)


As the map panel was larger than 10", I did some hand quilting in a matching blue around the continents:


And in the large navy square added a couple of lines of 'waves':


Belle embroidered us up a fantastic little label for the back of the quilt:


But didn't quite finish stitching it on in the car ride to Kat's house, so finished it off after the gift had been opened ;)


Above you can see the backing was a fantastically coordinating navy nautical style print that Sarah spotted in Rathdowne Fabrics.

The quilt took us about a day to finish, excluding the label and hand quilting. Everything else was done by machine, including stitching on the binding. At some points it was much quicker having 4 of us working on it, (with 2 cutting and 2 piecing when constructing the blocks) but at other times only one person was working on it at a time (eg quilting and binding).

We all felt a little guilty getting together and specifically not inviting Kat along, but hopefully the outcome was worth it!

Sunday, March 17, 2013

Meet Ralph...


Today I have somebody very special to introduce you to; his name is Ralph.


Ralph was conceived in my pattern making classes, as an exercise in making patterns from the fitted skirt block that we made.


Ralph has a yoke/waistband, and is designed to sit below the waist. Instead of darts the front is split into three panels. In the back Ralph has two darts for optimal shaping over my bootylicious behind. And of course Ralph has pockets.


This particular version of Ralph is made from some wool left over from making my Thurlow Shorts, and is lined with some black lining fabric I had lying around. Ralph is fastened with a centre back zipper, which is lapped (because I wanted to try something new) and hand picked.


Ralph is a little bigger than he was intended to be (partly due to me not trying him on before putting in the zip) so sits slightly lower than originally planned. But since he really is quite short that's probably a good thing, as if he actually sat where he was designed to sit, things would be a bit indecent.


Thanks to the lovely Sarah for snapping these pictures for me. During the process Sarah commented that I looked a bit like a ballerina, which led to this...


Which of course led to this...


Anyway, that's Ralph, I hope you like him as much as I do.

PS: I took the plunge and purchased a domain name this weekend; if you visit www.mymessings.com you'll arrive right back here at my blog :)

Thursday, March 14, 2013

Silk Cotton Portrait Blouse


This past weekend was a long weekend here in Melbourne, and I spent a very enjoyable weekend doing a combination of playing SimCity and sewing up this blouse. I wanted something nice and easy to work on, and since my first version was so successful, I decided to get on with making another version of Gertie's Portrait Blouse.


This iteration is made with the silk-cotton blend that I bought when Social Sewing went on the road. It really is beautiful fabric to work with, I'll definitely be keeping my eye out for more of the same or similar. It was easy to cut, easy to sew and easy to press. Nothing to complain about at all!


The blouse was made almost identically to the first, except I lowered the armholes by about an inch as I have found the armholes on the first version a tiny bit restrictive. However it turns out this wasn't the right alteration to make, as now you get a nice view of the side of my bra at the bottom of the armhole. Thankfully I kept the bits I cut off, so I'll have to try something different next time. Again. the armholes and neckline were finished with self bias binding, and the hem just a narrow rolled hem.


This silk-cotton blend, which is a lot like a voile but with a slight sheen and an incredible soft-ness, has nice drape but doesn't have the weight that the silk crepe de chine had, so doesn't hang quite as well as the first version, but is still more than appropriate for the style of blouse. As you can see in the pictures, it works tucked in or left loose.


Between this and the Pendrell Blouse I'm pretty sorted in the simple blouse pattern department these days, which is nice! I'm finally getting a nice collection of smart separates as an alternative to dresses for work.
Related Posts Plugin for WordPress, Blogger...