Showing posts with label Friends. Show all posts

Saturday, February 14, 2015

Floral Eva Dress


One of the things I love about my sewing friends is he generous they are. Generous with their time. Generous with their knowledge. And most relevant to this post, generous with their stashes. You've seen my profits from other people's stashes before, most recently the fabric from my first Granville. The subject of today's post is another example of others generosity, this time the lovely Kathleen.

At social sewing a few months ago Kathleen had brought some fabrics along to find a new home, and I pounced! I grabbed this gorgeous rayon jersey, and also some lovely brown suiting.


I knew right away what this fabric was going to become; another Eva dress. The fabric is almost identical in properties to the rayon jersey I used before, so I knew I could use the same alterations as last time. I also did a bit of a pattern hack to remove the pleat in the back of the skirt.

My only issue with this version is the pronounced lines coming down from my neck. I think this is at least partly because I took the back bodice in at the centre back too much. I might try unpicking the clear elastic I put in the back neckline and replacing it with a longer piece to let the back neckline be a bit wider.


Other than that I love the dress. The print is just stunning. I don't think I've ever seen anything like it in any shops. Thank you Kathleen! I am very grateful for your generosity.

Saturday, December 27, 2014

A quilt for baby-squirrel


This is another seriously overdue blog post, as I made this quilt about 9 months ago, eek! Time flies when you're being slack.

This quilt was a gift that I made for Sarah and her newest bub.


While that seems nice and selfless, I was a great excuse for me to use the woodland animal (plus blue giraffe??) fabric I have used as a feature, which has been in my stash for aages. I had seen the fabric at a quilt show and couldn't resist buying it because it's so cute, even though I had no plans for it whatsoever (unusal for me).


I then selected other fabrics from my stash that coordinated with the animals for the rest of the quilt top. To finish off the quilt I bought coordinating backing and binding.


To design the quilt I sketched up the design on squared paper, carefully mazximising the use of the woodland fabric, and also the solid orange I'd decided to use, which with some very careful cutting I used almost every scrap of (hence needing to buy different fabric for binding).


I also used this quilt as a way to have a bit of a practice with free motion quilting before embarking on a bigger (also as yet unblogged) project, just to make sure my free motion skills weren't completely rusty.


And I'll leave you with some lovely pics of the tiny recipient on the quilt (she's not this tiny anymore!)...

Wednesday, December 3, 2014

Eva Dress... or the day I accidentally made a maxi dress.

Back in May Oanh posted on her instagram about an Eva dress that she had made, but didn't really like because it was too short for her. She very generously let me try on the dress and even more generously gifted it to me when I (surprisingly) fit into it (Thanks Oanh!). Ever since then I have called it the dress that Oanh made me. It's also a little short on me too, but that's nothing a pair of opaque tights doesn't fix, and so this dress got a fair bit of wear over the winter. It also works well with a long sleeved black shirt under it too.


Due to enjoying the dress so much I decided to make another version, adding a little bit of length, using some (I think Viscose) jersey that I got in the swap in London last year.

So, after trying on Oanh's dress I decided to add 1" of length to the bodice and about 2-3" of length to the skirt, which in theory would add the right amount of length for the dress to hit at knee length.

However, I forgot one vital thing with respect to knits; different knits do not behave the same as each other! In particular, the knit I was using is a 4-way stretch, whereas the knit that Oanh had used was a 2-way stretch...


I stitched up the dress, carefully following the (confusing at times) instructions and then tried it on and was incredibly disappointed to discover that the dress was practically at my ankles! Not good!

The dress was relegated to the naughty corner for a while until I felt I had the motivation to take it apart and fix it (as I still wanted this dress). Before taking it apart I tried it on again and worked out that I wanted to remove 2-2.5" of length from the bodice, so that's where I started. The dress was fairly large all over so I just cut off the overlocked seam allowances, not worrying that the dress would therefore be about 1cm smaller on all seams.


While reconstructing it I also took the opportunity to fix up my botched job of the back neckline. Rather than the confusing binding method that the pattern suggested I used clear elastic in much the same method that is recommended for the Maria Denmark day2night top.

I stitched the dress back together and tried it on again... it was better but still needed a heap removed from the length of the skirt, where I hacked off 4-5" of length. Now I was starting to get somewhere!


One last alteration that I made was to take in the fullness in the back bodice; I did this by adding a seam up the centre back that took out the fullness where the pleat was in the bodice back, but keeping the pleat in the skirt. Thankfully with the solid fabric the seam isn't too obvious.


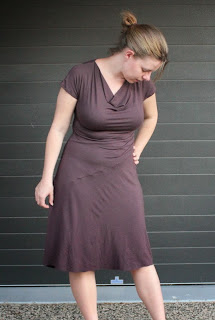
I'm not completely sold on the pleat in the back. I think there are too many components going on in this dress with the cowl, the drape and also the back pleat. I think it would be nicer with just a standard a-line skirt in the back.


I do particularly like the draping on the front, it add something different from anything else I've seen around. Although my alterations have further emphasised the strange extra pull-lines coming from the edges of the neckline, is that something I should worry about for any future versions?


In these pictures I'm trying out the no-hemming philosophy with knit dresses... and I have to say I'm not completely sold. I've worn it once like this and the lack of hem feels makes the dress feel unfinished and like it's missing something. I will try it once more, but at the moment I'm erring towards hemming it.


Overall I'm pretty happy with how this dress turned out in the end, and have thoughts of making at least one more in a gorgeous floral viscose knit that Kathleen ridiculously generously donated at social sewing last month and I was lucky enough to grab.

Tuesday, September 16, 2014

The Helen dress


The namesake of this dress is the fantastic and beautiful Helen, aka Funkbunny, who very generously gifted me this fabric. If you hear us referring to the "Ballan Collection" we are affectionately referring to our almost matching dresses.


A motto I like to live by is "you never know unless you ask" - that if you don't tell people stuff they'll never know. Importantly, asking doesn't mean expecting, no is a perfectly acceptable answer, it just means putting it out there. This theory extends quite well into my current work, which is all about making sure your wishes are known, but it turns out it extends well into sewing too (and also chocolate).


At social sewing a while back Helen was cutting out a lovely dress from this fabric and I expressed that if she needed a home for any leftovers then I could volunteer. It turned out, she had some fabric left over after cutting out her dress, and she generously offered the left overs to me. I gratefully accepted, planning on making a fabulous pencil skirt from the stunning sateen (wow too many adjectives in that sentence, but nevermind).


When laying out the fabric ready to cut out the skirt, I discovered that there was quite a lot more than I realised, so made the decision to make a dress instead of a skirt. I decided to do this by simply adding a bodice to the skirt pieces I was already planning on cutting out. I did this due to a combination of being lazy and not being sure if I quite had enough fabric to eliminate the waist seam. The bodice is my standard self drafted bodice, with the neckline changed to be a boatneck.


I didn't bother lining the dress, and finished the neck and armholes with some red bias tape. Part of the reason was again laziness, but also not knowing what to line the dress and still retain the stretch in the sateen. Anyone have any great tips on that?


Overall I'm pretty happy with this dress. It's a nice pop of colour for me to wear to work. However I do have some reservations about it and how flattering it is. Maybe the existence of the waist seam is causing that effect, and wearing it with a thin belt (which I don't have) would solve that problem, we'll see I guess. However, I'm a cold creature and so far have worn it with a jumper over the top anyway it's not a deal breaker for me as that way it is fine.


Thank you again to Helen for the generous fabric gift!

Friday, August 8, 2014

The Laura Skirt


This skirt is the love child of some fabric pinched from Mindy's stash before she went overseas (miss you Mindy!!) and stealing the idea that Laura had beautifully implemented on a skirt she made a while ago (hence the name of the skirt).

I took my standard pencil skirt pattern, and converted the darts into princess seams on the front and back of the skirt. Then, rather than having a vent or slit at the back, added a lovely little flounce between the back princess seams.

In these photos the skirt is shown worn with my silk portrait blouse.


(I really should have ironed the skirt before taking these photos)

I deliberately left in the centre back seam above the flounce. I considered removing it and moving the zip to the side, but decided I would rather have a centre back zip.

This skirt is SO comfortable. I have no idea what the fabric is, but it's got a slight bit of stretch in it, and just enough body and weight that it doesn't get pulled around by my tights when I walk.


A fairly simple staple, with a little bit of interest, which has been a fantastic addition to my working wardrobe. I hope to make a few more of this skirt.

Sunday, July 13, 2014

A quilt for baby Riley


I recently made a quilt for my good friend Simon and his 1 year old son Riley.

The criteria for selecting the fabrics and design were that the quilt needed to:
a) feature blue heavily
b) be awesome


So, with some help from the boy, I selected the above bundle of fabrics at GJs. After some playing around we settled on this fairly simple design, in order to let the fabrics shine:


And then, guess what, one of the fabrics does shine! ...well glow... it turns out the Star Wars fabric is glow in the dark!
  
If I hadn't been pressing it in the evening and then turned the lights off we might not have found out; so check your stash for any secretly glow in the dark fabric guys!


It turned out that one of the fabrics I picked was designed by "Riley Blake", so I had a nice convenient name tag on the selvedge of that fabric!


I did different quilting in each of the sections, including loop-de-loops in the red section to mirror the print.


And after binding in red... a fantastic new quilt!!


Here it is with a happy dad after being gifted:


And doesn't Riley look cosy sleeping underneath it...


And it's plenty big enough for him to grow into...


Yay for a successful quilt!
Related Posts Plugin for WordPress, Blogger...