Showing posts with label Top. Show all posts

Monday, December 22, 2014

A Gingham Scout


I want to make more tops. As much as I love dresses, I find myself pulling skirt/blouse combos out of my wardrobe more often these days. However, excluding t-shirts, all my tops are either pendrell blouses or portrait blouses. I have a heap of lightweight woven fabric that I would like to make tops from (mostly from my trip to Europe last year), but I need to decide which patterns to use; it feels wrong just making heaps of the two same patterns!


In an attempt to broaden my range of top patterns, I decided to try out the scout tee from Grainline Studios. This top is essentially a "wearable muslin" to see what I thought of the pattern and the fit, made from some gingham (with surprisingly decent drape for a gingham) that a friend had given me after buying a heap for making muslins.


I cut the size 10, which is fine but I think a little big, including through the shoulders. So I've reprinted the pattern and cut out the next size down for the next version.

Despite being a bit big, this top is a nice easy 'neutral' top for my wardrobe, when worn tucked into skirts. I really like the neckline and sleeves. However, it's a bit boxy for me to consider wearing un-tucked (unlike my old faithful pendrell and portrait blouse patterns). I'm not sure if this is because it's a smidge big, or it will be that way whatever size due to not having any darts.


And so, I wanted to ask, do you have any nice top/blouse patterns you'd recommend for me to consider?
I would most likely usually be wearing it tucked into skirts, but the option to wear it un-tucked would be nice too. And being able to wear it with layers over it (eg cardigans or sweaters) is a MUST as everywhere is so over-air-conditioned!

Friday, May 24, 2013

Wrap Cardigans


You may have noticed from my Me-Made-May posts that I've made myself a couple of new wrap cardigans.


My intention was to copy a black RTW cardigan that I have (pictured on day 9). The cardigan pattern seemed pretty simple, the front pieces were basically just big triangles that wrap around your back, so I had a go at making my own pattern.


I started with my basic t-shirt block, modifying the pieces as follows:
- Shortened the front and back to have the hem sit at my upper hip (in the picture below left I'm indicating my waist with my finger)
- Widened the sleeves so they had a straighter shape and are bigger so they can be worn with another layer underneath
- Made the cross over front by extending the v-neckline down to past the other side seam.


I am intending on putting together a little tutorial of exactly how I did these alterations (particularly the changes to the front piece) and the construction of the cardigan in another post.


I stitched up the pale blue cardigan first, with some jersey that I had lying around in my stash to test out my pattern before making it up in my fancy merino jersey, which is what the grey version is.


After making the blue version and wearing it for a day I was happy with the overall fit, but I decided to lengthen the ties slightly, because I could only just tie them behind my back as they were (see the teeny tiny knot in the above photo). Everything else was great though, and after extending out the tie a couple more inches I cut into my Merino Jersey.


I constructed the pale blue one entirely on my sewing machine, using a combination of the triple-stitch to sew the seams, and a zig-zag around the neck band to hold the layers together. The jersey wasn't going to fray so I didn't finish any of the other seams. I also added clear elastic to the shoulder seam like I do with all my t-shirts.


The grey version was sewn up on a combination of overlocker and sewing machine. I don't currently have an overlocker, I just don't have the space. However Helen very kindly let me use hers at the last social sewing day.
        

The seams were all stitched using the overlocker, with the sewing machine only being used for the hems around the bottom and on the sleeves.


I know that the sewing machine finish is perfectly strong and will last, but the overlocked one really does look neater inside doesn't it! *sigh* oh to have the space for an overlocker...

Anyway, I am really happy with my new wrap cardigans. Hopefully you like them too and will be interested in the tutorial for making one.

Thursday, March 14, 2013

Silk Cotton Portrait Blouse


This past weekend was a long weekend here in Melbourne, and I spent a very enjoyable weekend doing a combination of playing SimCity and sewing up this blouse. I wanted something nice and easy to work on, and since my first version was so successful, I decided to get on with making another version of Gertie's Portrait Blouse.


This iteration is made with the silk-cotton blend that I bought when Social Sewing went on the road. It really is beautiful fabric to work with, I'll definitely be keeping my eye out for more of the same or similar. It was easy to cut, easy to sew and easy to press. Nothing to complain about at all!


The blouse was made almost identically to the first, except I lowered the armholes by about an inch as I have found the armholes on the first version a tiny bit restrictive. However it turns out this wasn't the right alteration to make, as now you get a nice view of the side of my bra at the bottom of the armhole. Thankfully I kept the bits I cut off, so I'll have to try something different next time. Again. the armholes and neckline were finished with self bias binding, and the hem just a narrow rolled hem.


This silk-cotton blend, which is a lot like a voile but with a slight sheen and an incredible soft-ness, has nice drape but doesn't have the weight that the silk crepe de chine had, so doesn't hang quite as well as the first version, but is still more than appropriate for the style of blouse. As you can see in the pictures, it works tucked in or left loose.


Between this and the Pendrell Blouse I'm pretty sorted in the simple blouse pattern department these days, which is nice! I'm finally getting a nice collection of smart separates as an alternative to dresses for work.

Sunday, January 13, 2013

Sorbetto with Granny

Since it's the weekend, I wanted to take a break from the sew-along and share with you what I got up to last weekend with my Gran. Do you remember the fabric I bought for my gran just after Christmas? Well last Sunday we spent the day having a sewing date to sew the fabric together into a Sorbetto Blouse.


It was quite fun introducing my gran to the concept of downloadable pdf patterns, and even more fun spending the day sewing with her.

We used a self bias binding around the arm and neck holes, but turned it around to the outside so it was visible.


Doesn't the top just look fantastic on her! Thanks for a very enjoyable day Granny!

Thursday, September 20, 2012

Portrait Blouse

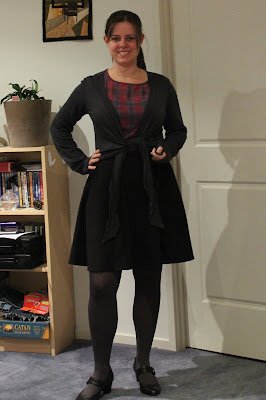
You may have noticed that it's been a bit quieter around here this week than the last few, and that's because I started a new job on Tuesday - hooray! It does mean that I have been very tired and had less time for sewing and blogging.


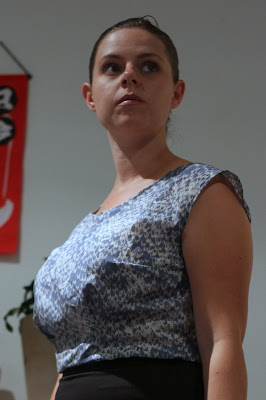
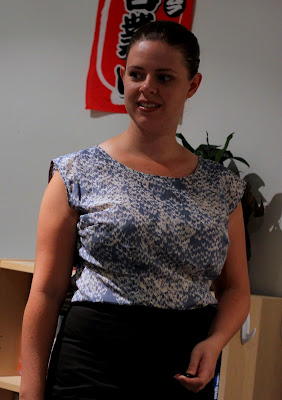
I have however managed to get a little sewing in each night, and last night I finished a portrait blouse, the first pattern that I've tried from my copy of Gertie's New Book for Better Sewing.


It it also the first garment I've made where I've done a FBA. I traced the pattern in a size 6 (rather than a size 8 as suggested by my full bust) and then did a 1" FBA to add back the ease lost by going down a size (since there is 2" between each size).

I also traced the longest length, as she mentions that it's a short blouse and I figured it would be easier to shorten than lengthen at the muslin stage. I ended up keeping it at that length as I liked it. So if you plan to make the blouse bear that in mind, especially since I'm 5"4 with a relatively short body.


After the FBA I made a muslin, from which I made the following alterations:
  • I added 5/8" onto both the front and back side seams
  • I removed some length from the shoulder seams - about 1/2" at the front and about 1 1/2" from the back
  • I then redrew the armholes so they were approximately the original size
  • I lengthened the back by about 1" at the centre back, tapering to nothing at the side seams
  • I lengthened the bust dart slightly
Having now worn the finished thing, the only changes I'd make to any future versions would be to scoop out the back of the armhole slightly, and maybe make the neckline very slightly higher. But that's just me being super picky really.


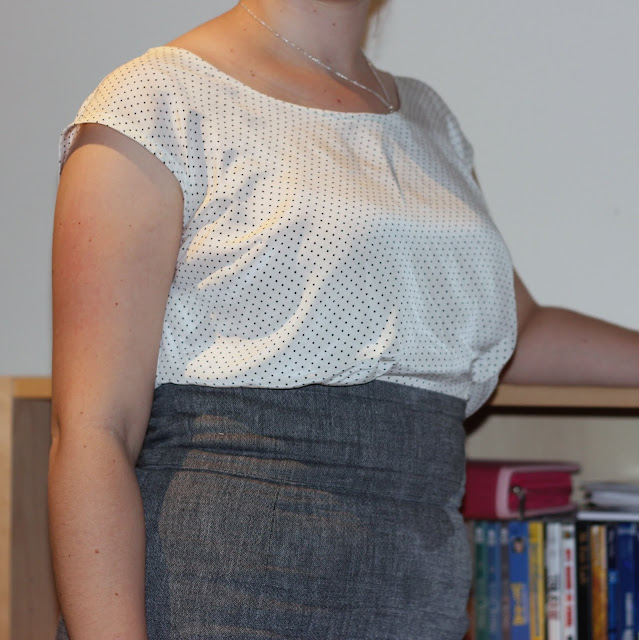
The fabric is a Silk Crepe de Chine that I bought waaaay back at the beginning of 2010 from Tessuti. I was intending to make a Sencha blouse from it, but that never happened, so when I was hunting in the stash for fabric that might be suitable for a pattern from Gertie's book it was an obvious choice.


Now, please bear the date of purchase in mind when you compare it to the example blouse in the book - it is a complete coincidence and I did not intentionally copy Gertie's version! Besides, her spots are bigger and if you read the text hers is a silk charmeuse, not crepe de chine (although my fabric knowledge isn't great enough to know if there's any real difference there!)

The silk was super slippery and slidey, so I used my rotary cutter (brand new blade!) and awesome super large cutting mat to cut out the pieces.


With regards to the contruction of the blouse I made three changes from the suggested construction in the book.

The first was omiting the facings and instead finishing the neckline and arm holes with self-bias tape. I used the method Tasia uses for the Pendrell blouse to make and attach the bias binding (cutting strips 2" wide) as I really liked the method when I used it on my Chiffon Pendrell and thought it'd be good for this fabric, as the crepe de chine was fiddly to sew. I initially did this because I find facings annoying, both to sew and to wear, but I have since realised that it was a good call as the fabric is slightly sheer, so the facings would have been super obvious.


The second was not sewing the vertical darts all the way down to the hem (see below). At the front I stopped around about where the hem line would have been for the size 6 (I think), and at the back about 1 1/4" higher than that point. I preferred the way it looked this way, and also meant that I didn't need to add any extra width for my hips!

The last change was omitting the zip in the side seam suggested in the book.


I wore this blouse (tucked into my grey jenny skirt, as in the top photos) all day at work today and it was really comfy! (which also explains it being slightly crumpled). However, after changing into jeans to take some untucked photos I think it would also be great worn like that more casually. A big success I'd say! If this is an indication of what the rest of the patterns in the book will be like then I'm even more excited about it!

Saturday, December 3, 2011

The t-shirts of goldilocks...

Do you remember the t-shirt I made earlier in the year? (pictured below) Well I have since made a few more, but am still ironing out some of the kinks in the pattern (not that there's any problems with it, it's one of my most worn t-shirts these days, but there's nothing wrong with wanting to improve things).


I made another iteration from some brown jersey that I got from The Fabric Store, specifically with the intention of making something to match the planned spotty crescent skirt. The pattern was a direct replication of the first shirt and turned out pretty well...


...except that I forgot that I'd been meaning to add a tiny bit of width to the shoulders of the shirt, so the shoulders of this one (as well as the first) are a little bit narrow.

My next iteration was a sky-blue version (some more fabric from The Fabric Store, this time picked up in a sale), and this time I did remember to add some width to the shoulders...


... but I added a bit too much, and the shoulder seams are puckery and lumpy because they're too long. I'm considering chopping off the seam allowances of the sleeve seams and reducing the width of the shoulders a bit to see if that fixes it up (unpicking the triple stitch isn't really an option with the jersey).

One success though is the conversion of the v-neck into a round neck - some more of the story of which will be further detailed at another time!

And there you have it, one with shoulders to narrow, one with shoulders too wide. Here's to hoping that the next one will be juuuust right!

Saturday, September 17, 2011

Coffee Sorbetto

After finishing my Genome quilt I decided that I needed to take a break from big complex projects and do something nice and simple. Conveniently The Fabric Store had just gotten in their new spring fabrics, which include some gorgeous cotton voile/lawn.


Above are the fabrics I bought. From left to right: Black merino wool jersey, navy cotton/lycra jersey, blue organic cotton jersey, beige and brown spotted cotton, plain brown cotton, brown silk suiting.

I bought the beige and brown fabric and the brown fabric to make a sorbetto. After seeing so many gorgeous variations around the internet I decided to have a go at making one of my own to see if the style suits me. (I was a little concerned because of the lack of shaping that it wouldn't work with my boobs).


Overall I'm pretty happy with how it turned out. The pattern was very well drafted, however the instructions were a little confusing for the binding. I thought I had followed the pattern instructions but after discussion with Mindy we now think I did it differently (not that it really matters). Also, the continuous binding tutorial linked in the pattern completely eluded me - I COULD NOT get the stripes to line up and after three tries I gave up and didn't bother trying to make it continuous.

One other, slightly more serious gripe however, is the inaccuracy of the fabric requirements stated in the pattern. I bought the amount of fabric suggested in the pattern: 1.5yards (ie approx 1.5m). However this ended up being easily twice as much as I needed (ie I have more than enough fabric left over to make another top if I wanted to!) I was a little disappointed by this, and wanted to point out to anyone considering making this pattern that you do not need 1.5m, if the fabric is over about 120cm wide (size dependent) you need about 75cm as you can fit the two pattern pieces side by side and fold the selveges to the centre (a little more if you want to lengthen the top).


Other than that I followed the pattern faithfully, making no alterations.to the size 6 pattern. However if/when I make another one I think I will lengthen it just a tiny bit, and also pinch out the gaping at the armhole and transfer it to the bust dart.


I say if because although I really like the pattern i'm not sure how practical it is. It looks fine tucked into a skirt but left untucked it's a bit sack like, and thus it's a bit of a smarter item. However, smarter items tend to be worn in places like offices and such, which are generally FREEZING cold due to over-air-conditioning and I have to wear at least one jumper (even in summer). This top can be worn with a jumper (see below, that's how it was worn the one time I've worn it so far), but it seems a shame to cover it up, and with the cotton it crumples a bit.


However, having said that, I think it would be a FANTASTIC summer pyjama top, and since some of my summer PJ bottoms are starting to fall apart I expect I will be making some as the weather warms up and I may make some matching Sorbettos to wear with them. We'll see.
Related Posts Plugin for WordPress, Blogger...