Showing posts with label self-drafted. Show all posts

Monday, February 2, 2015

Faux-Sureau

Have you seen the Sureau pattern by Deer and Doe? It's a lovely dress pattern with gathers either side of a little placket down the centre front. This dress is heavily inspired by the sureau pattern, except I altered my bodice block to make the pattern rather than using the actual sureau pattern, hence faux-sureau.


I have a confession however; I actually made 90% of this dress almost a year ago, but I didn't finish it off before the summer weather disappeared, so there didn't seem much point finishing it off then, when I wasn't going to be able to wear it for another 9-10 months. So I finished this off in my Christmas sewing binge, and what a satisfactory project it was, as all that was left was the zip and hem! I was finished before I knew it!


The pattern alteration was pretty simple. I rotated the bust dart to the centre front and converted it to gathers, subtracted the desired placket width, and changed the neckline to a v-neck. I may have been a little over-eager with this last alteration, and it's a little lower cut than I would normally make. If I were to make it again I would also move the gathers down a little so they're centered over my bust rather than being over the top half.

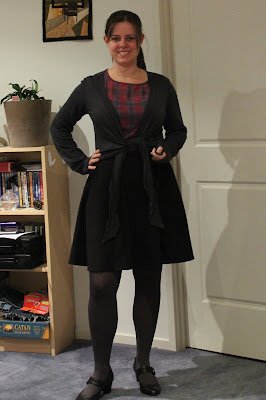
Rather than completely mimicking the sureau and adding a gathered skirt, I added the good old standby belladone skirt as I preferred an a-line skirt over a gathered one.


To correspond with the lightweight seersucker fabric and keep this a lightweight summer dress, I left the skirt unlined, and lined the bodice with a very light weight voile (principally to finish the edges rather than to 'line it'). I also found that some tiny prick stitches down the placket made the bodice front sit much nicer. Lastly I hand picked a dress zip into the back of the dress.


I'm fairly happy with the fit. I did some stupid alterations to take the waist in, which in hindsight I would have done differently (or ideally made the waist the right size to start with!). These alterations make the skirt sit a little funny, but not so much that it's a big issue. The bigger issue is that while the fit of the dress is pretty good when I'm stood up straight with my shoulders back (y'know, good posture we all like to think we have but don't really), as soon as relax and hunch over the neckline tends to gape a little.


Pattern: Self-drafted bodice, Skirt from Belladone by Deer and Doe
Fabric: Pear Print Seersucker from Spotlight
Notions: Thread, matching dress zip, voile for lining.

See alsoBimble and PimbleTybalt King of CatsThe Nerdy Seamstress

Friday, May 24, 2013

Wrap Cardigans


You may have noticed from my Me-Made-May posts that I've made myself a couple of new wrap cardigans.


My intention was to copy a black RTW cardigan that I have (pictured on day 9). The cardigan pattern seemed pretty simple, the front pieces were basically just big triangles that wrap around your back, so I had a go at making my own pattern.


I started with my basic t-shirt block, modifying the pieces as follows:
- Shortened the front and back to have the hem sit at my upper hip (in the picture below left I'm indicating my waist with my finger)
- Widened the sleeves so they had a straighter shape and are bigger so they can be worn with another layer underneath
- Made the cross over front by extending the v-neckline down to past the other side seam.


I am intending on putting together a little tutorial of exactly how I did these alterations (particularly the changes to the front piece) and the construction of the cardigan in another post.


I stitched up the pale blue cardigan first, with some jersey that I had lying around in my stash to test out my pattern before making it up in my fancy merino jersey, which is what the grey version is.


After making the blue version and wearing it for a day I was happy with the overall fit, but I decided to lengthen the ties slightly, because I could only just tie them behind my back as they were (see the teeny tiny knot in the above photo). Everything else was great though, and after extending out the tie a couple more inches I cut into my Merino Jersey.


I constructed the pale blue one entirely on my sewing machine, using a combination of the triple-stitch to sew the seams, and a zig-zag around the neck band to hold the layers together. The jersey wasn't going to fray so I didn't finish any of the other seams. I also added clear elastic to the shoulder seam like I do with all my t-shirts.


The grey version was sewn up on a combination of overlocker and sewing machine. I don't currently have an overlocker, I just don't have the space. However Helen very kindly let me use hers at the last social sewing day.
        

The seams were all stitched using the overlocker, with the sewing machine only being used for the hems around the bottom and on the sleeves.


I know that the sewing machine finish is perfectly strong and will last, but the overlocked one really does look neater inside doesn't it! *sigh* oh to have the space for an overlocker...

Anyway, I am really happy with my new wrap cardigans. Hopefully you like them too and will be interested in the tutorial for making one.

Monday, April 15, 2013

SewCieTea Dress - The Real Thing, In Liberty


You've seen the first practice dress, and the second practice dress, and finally I am showing you the real thing, made of the precious Liberty fabric given to me by my Gran.


To quickly recap the details of this dress, I wanted to make a 50s style full skirted dress, with a fitted bodice and a wide scooped neckline. Rather than spend ages hunting for the perfect pattern and then even longer adjusting it to fit, I chose to use my self-drafted bodice (used here and here) and change the neckline and armholes to suit my vision.


To make the neckline I adopted a really scientific approach; I put on my peacock dress and measured down about how much lower I wanted the front neckline, how much higher the back neckline needed to be, and where I wanted it to fall on my shoulders (mostly dictated by where my bra straps sit) and drew it on to a copy of the pattern, using my french curve to help smooth the curves. I then also extended out the shoulder seams slightly to give the impression of slight cap sleeves.


I fluked out with the neckline, and really liked how it turned out on the first practice dress. After some input from friends confirming some ideas that I'd had, I decided to try adding a contrast band around the neckline and at the waistline. The band at the neck is 1.5" wide, and the waistband is 1.25" (based on the waistband of the Cambie.


I also added a pocket into the RH side seam in the second version, using the pocket piece for the full-skirted Cambie. In all versions the skirt is just a circle skirt (I used the pattern piece from vogue 2902 rather than draft one).


I didn't make any changes after the second practice version, and took my time on the construction of this dress. The inside is almost as beautiful as the outside.


The bodice is underlined with some cream cotton batiste.


I finished the armholes with bias binding (hand stitched to the underlining so it's invisible from the outside) and did french seams on the shoulder seams..


For most of the seam allowances I turned them under and stitched them to give a lovely clean finish.


The waistband was finished with a second waistband piece on the inside, that was machine stitched onto the waist seam allowances at the top, and slip stitched along the bottom.


You can just see it above, the only seam that didn't have all of the raw edges enclosed was the pocket, where I just zig-zagged.


The side zip is a hand picked lapped zip...


I even changed thread colour for the 1.25" of the waistband!


I really do love how a hand-picked zip looks.


The contrast band on the neckline was sewn on like a facing, but on the outside. I will be sharing a post later this week (hopefully) with details of how I constructed the bodice with this contrast detail.


I am incredibly proud of the top-stitching; I love my top-stitching foot!


The skirt wasn't lined, as I wore it with my new Crinoline! (post to follow)


I'm still not completely sure about the crinoline. I've never worn one before (except for a few photos), and I was incredibly aware that I was wearing it all afternoon.


At the time it felt a tad conspicuous and costume-y, but looking at the photos I really love the silhouette of the dress with the crinoline underneath it.


So the jury is still out as to whether it will be worn with or without the crinoline for the wedding I'm planning on wearing it to in the UK in July.


However, I am madly in love with the dress, I really do think (and hope) I've done The Liberty and my Gran proud.

Related Posts Plugin for WordPress, Blogger...