-
Zipper (Lined Skirt)
-
Finish the Waistband and Extras
Guess what! Today is the last post for the sew-along!! After today we will have finished our skirts! How exciting!!!
The last step we need to do is hem the skirt. Again, I'm going to show you two different ways to hem the skirt, one easier way, and one where all the raw edges are hidden.
Checking Hem Length
However, before you can hem your skirt you need to check the length of the hem on you. I often find that my skirts are shorter at the back than the front, due to a combination of the tilt of my pelvis and my protruding behind. For this reason, I usually hem my skirts longer at the back than the front.
To check the length of your skirt I recommend recruiting a friend (or long suffering other-half) to help you measure. Put your skirt on, and get your helper to measure up from the ground to see how long your skirt is on you. I was just finishing off my skirt at Social Sewing, so I recruited the lovely
Mel to help check the length of my skirt:
Mel checked the length by measuring up from the ground with a measuring tape, but I've also used a long ruler, or the handle of my broom in the past. It doesn't actually matter what the measurement is, just that it's even - so you don't actually have to use something that 'measures'.
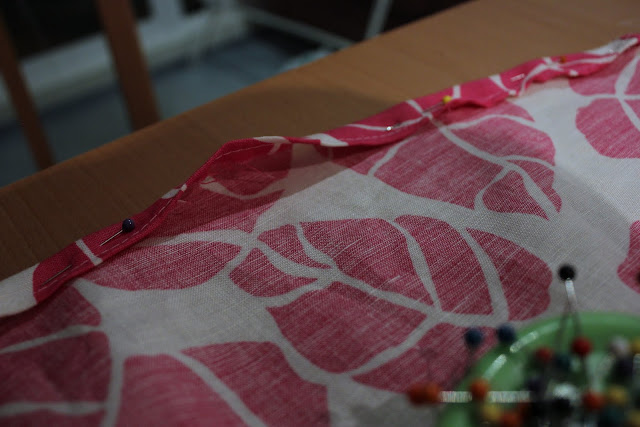
Below you can see the line of pins that mark an even amount up from the ground once I was wearing my skirt. The front is on the right, the back on the left - you can see that I need to shorten the front slightly to make it the same length as the back and the sides:
So I trimmed off that extra with a smooth curve.
You should do the same thing to check the length of your skirt. Once you've done that you can move on to hemming it.
Hemming Method No. 1
The first method I'm going to show you is the simpler method, where you just finish the raw edge, fold the hem over once and top-stitch it. This method is perfectly fine to do, and what I chose to do with my black skirt.
First you need to finish the raw edge of the hem. I did this with a zig-zag stitch:
Now fold up the edge however much you want to hem the skirt. I folded mine up by about 1/2":
Sew a line of stitching near to the raw edge of the folded up hem. It should look something like this from the wrong side:
And like this from the right side:
Give it a press, and you're done!!
"Hidden Raw Edges" Hemming Method
The other method I'm going to show you is one where you fold the hem up twice, thereby hiding all the raw edges However, it's not quite as simple as the above method, because of the shape of the skirt, you'll find that once folded up the edge is larger than the skirt it's being folded over. Sorry, it's a bit hard to explain, hopefully this photo will show what I mean, do you see how there are the 'bumps' of fabric in the hem where the hem is longer than the skirt under it:
Well to make it easier to sew the hem, and avoid getting big tucks, we want to 'ease' the hem into the length. To 'ease' the hem you need to sew a line of stitches with a long stitch length near to the edge, which we'll then pull on to 'squish' the longer edge into the space we need it to go into.
To do that, fold your hem up by half of your hem allowance, and sew a line of stitching at the longest stitch length your machine can sew close to the fold:
It should look something like this:
Now we'll fold the hem up the other half of the hem allowance. You can see in the picture below how the folded edge is longer than the skirt below it:
You need to pull on one of the stitches, and pull up on the thread to 'ease' the fabric to the length you want it. You can see below what the same spot on the skirt looked like after I had pulled on the threads to ease it to the right length:
Now you need to sew the line of top-stitching near the folded edge to secure your hem, just like in the first method:
Once you're done, give it a press and it should look something like this on the wrong side:
And this on the right side:
You can remove the basting stitches now if you wish, but it's also not the end of the world if you leave them in, just trim off any long loops from the easing.
And we're done! How exciting!! Pat yourself on the back for making a fabulous skirt!
I'll share my two sew-along versions with you tomorrow and Monday, and then if you comment or email me with pictures of or links to your skirts, and I'll share them all here on the blog in a 'Hollyburn Party" on the 11th of Feb. Just make sure that you share your skirt with me before 5pm Melbourne time on the 11th of Feb.
Missed any of the sew-along posts, or just want to re-read them? You can find the full list here.