Showing posts with label Shirt. Show all posts

Monday, January 19, 2015

Granville v01 aka the Cinderella shirt

I am really excited about the Granville pattern from Sewaholic that was released last week. I have been excited about this pattern since meeting Tasia in November, as she was wearing her liberty version that day.

So excited that I downloaded the pdf version the day it was available and started making a version straight away.
So excited that I didn't really think through sizing/fitting properly...

Based on my measurements I cut a straight size 10, no alterations. It seemed like a sound decision at the time, that's the size I normally make for sewaholic, and I didn't have to do a FBA on the pendrell blouse, so surely this one would be similar and fit too...?


Yeah, it doesn't fit. It is almost comically too big. It is too wide through the shoulders, the collar is a bit too wide, there is pooling at my lower back and it's too long in the body and the sleeves. It's also a bit funny through the hips (not so clear in these photos as these photos were taken at social sewing and I didn't think to bring anything else for my bottom half than the flared skirt I was already wearing), being too wide at the sides but snug at the back (as much of my circumference at the hips is my bum, rather than having wide hips persay).


It's also a bit long between the shoulders and bust. The armholes are a bit low on me, and if I move my arms around, it all hoiks up over my bust and stays there when I put my arms back down.

So yeah, not such a good look... Thankfully, not all is lost, there are benefits to having lovely local sewing friends, as I didn't have to look very far to find a new home for the shirt. As Oanh termed it, the shirt became a Cinderella shirt, and the lucky one that it fit was Sarah.


Sarah and I have very similar measurements, our bust, waist and hips are pretty much the same, but as you can see, it's not as simple as that! A shirt that looked slightly ridiculous on me looks fabulous on her!


The above picture is even after she has been moving her arms around like crazy and hasn't readjusted the shirt at all.

So, once I have examined the shirt a little more to determine which size/alterations I should make for my next version, this almost finished shirt will go to live with Sarah. It's a very sharing shirt, given that the (gorgeous) fabric came from Kat to start with.


Despite the fit issues, which really are my own fault, I am very happy with this shirt. Working step by step through the instructions I am thrilled with how well the finish turned out. The act of sewing the shirt together let me flex my sewing muscles and learn some new techniques.


So onward and upwards. I am still excited about this pattern, but for my next version I will take my time with determining my size and hopefully the fit will be more suited to me...

Tuesday, September 4, 2012

Button Indecision

I've made a good start on my stash-busting attempts that I talked about here. I cut out the blue and red shirting for a JJ shirt last week at Bek's house and stitched the princess, side and shoulder seams. Then I got confused by their instructions for the collar so put it aside until I could look at the one I've made before. Last night I pulled it out and added the collar and sleeves.


I was even thinking at one point that I might be able to wear it today, but then I realised I'd completely forgotten about the buttons! Whoops! I pulled out my meagre button stash to see if I had anything, but the only buttons i had more than three of were the below ones, which I didn't really like with the fabric - they were too shiny and a smidge too small. They were bought for another fabric, so can continue being saved for it.


I laid out the other buttons I've got to see if any of them spoke to me and would help with choosing what to buy. I decided I preferred the slightly larger ones, and preferred the matte ones as opposed to the shiny ones. (I'm also often taken with mix and match buttons in general, but don't think this is the project for that)


What buttons would you use for this shirt?


PS: I'm not sure I'm loving the shirt, the strong vertical stripes down the front just feel a bit overwhelming and I'm not entirely sure that I didn't put the sleeves in back to front, as the poof from the gathers seems to sit wrong.
PPS: I haven't finished fixing the princess seams yet, so it won't end quite as shapeless as the top photo.

Friday, July 15, 2011

Shifting Gears...

As much as I want to work on my Genome Quilt, a slightly more pressing need has arisen and it has been temporarily put aside.


Shirt Fabric - Top two from Tessuti, bottom one from Clegs. (All a bit crumpled as the photo was taken immediately after removing them from the washing machine to pre-wash the fabric)

I have (finally) found some work, but have discovered that my wardrobe doesn't really cater for work in the corporate world, so urgently need to correct that little issue. Earlier this week I bought a suit jacket and a shirt, but while that's good enough for an interview that's not quite going to be enough to get me through a whole work week! I need at least one more shirt. Rather than buying another shirt, however, I have got fabric for three different shirts in my stash that I really need to get around to cutting into. Thus, I have the weekend to transform at least one of those pieces of fabric into a wearable shirt.


I have a number of shirt patterns that I've made before (JJ, Emily and New Look 6732), but none of them are quite suitable. My JJ is great but as it doesn't have a proper collar doesn't feel smart enough for the corporate environment. The Emily shirt I made is in black poplin and is more suited to being a waitor than a receptionist, and the version of New Look 6732 is just a bit of a disaster and makes me feel like a 9 year old (who can't lift her arms more than 45 degrees).

Left: "Emily" Shirt, Right: "JJ" Shirt

I also have a shirt that I bought at Next for my graduation from Uni, but when I put it on the other week I discovered that the bottom half of the back panel is disintegrated, and despite trying to repair it, more rips keep appearing. That shirt fits really well, so I'm tempted to cut it up and make a pattern from it.

"Next shirt"

So, decisions - What do you think? Stick with the JJ pattern, but have a go at adding the Emily collar? Or dismantle the Next shirt and make a pattern from that?

Saturday, September 19, 2009

Indecision...

I'm being indecisive about two things this afternoon, so while I wait for it to stop raining before I go and check on my cells I thought I'd throw my indecision out there to the internets to see if anyone can help me with the necessary decisions.

Firstly... now I have a darning foot, work on my
little bouquet quilt can resume. However, before quilting can begin I still need/want to add leaves and I have two options regarding leaves and can't decide between them. Below you can see my two options, and close-ups of them.

Left: leaves made out of red and green tartan fabric
Right: leaves fussy cut from some fabric left over from a skirt


So what do we think? Which leaves should it be?

The second thing I'm being indecisive about is in regards to my next project(s); fabric sat begging to be made into shirts.

Firstly I have this Italian shirting fabric that I bought at Clegs last time they had a 20% off sale
I think this would make up very well into the Emily shirt on Burdastyle, but I'm more confident with getting a good fit with princess seams (as in the JJ pattern). So I see my options as:
1- Make the Emily pattern as is (with the shorter sleeves)
2- Make the JJ body with the Emily collar and sleeves - is this possible? can I mush together patterns like that?
Should I take the risk of the fit with the Emily pattern? (I could always make a muslin first to get the fit right, shock horror!) Or do I 'play it safe' and use the princess seams in the JJ?

Secondly I have this slightly stretchy fabric that I got from the $10 corner at Tessuti
But currently have no idea which pattern I'm going to use for it. Any suggestions?

While on the subject of shirts, another shirt pattern I'm just waiting to use is the Ute blouse (which Nichola has taught me the proper pronunciation.) Sadly I don't have the right fabric for that one yet.

Saturday, June 13, 2009

Finished(?) JJ

Almost Finished JJ
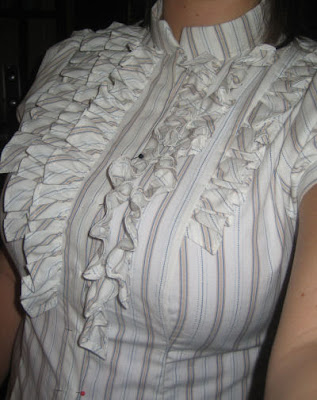
Thursday night was spent at my sewing machine finishing my JJ, which I then wore to work yesterday Overall I'm pretty happy with how it's turned out, and am intending on using the pattern to make some more shirts in the future.

However
there is one thing about it that I'm not sure about; the placement of the ruffles. The two centre ruffles on each side are much closer together than the second is to the third... and I'm not sure about that. However, having canvassed opinions from my friends at work I still don't know what I want to do about it, as everyone had a different opinion. The way I see it my options are:
a) Leave it as it is, a couple of people said they liked how it wasn't completely equal
b) Unstitch the middle ruffle and move it to be in the centre of the other ruffles.
c) Remove the outer ruffle from the seam and restitch it closer to the two other ruffles.
d) Remove the outer ruffle completely.
At the moment I'm leaning towards option a as then I can declare the shirt finished... but I dunno. I might wear it a few more times and then decide.

Other than the qualms I have about the ruffles I am now a complete fan of this pattern though! It was really comfy to wear all day (even under my lab coat, or rugby shirt), and I can actually move my arms around this time, unlike when I wear the first shirt I made. Best of all, the pattern is totally free!

(The photo isn't quite the finished product; incase you hadn't noticed it's missing the buttons, which it now does have)

Tuesday, June 9, 2009

Queens Birthday productivity


Playing with the macro setting on my camera and my housemate's mini-tripod

It was the queens birthday long weekend this weekend. I wish every weekend were a long weekend as then I'd have so much more time for sewing! Day one is for resting, day two for errands and day three for sewing!

This weekend, in addition to making an enormous mess in the l
iving room, I pottered around doing a few things, including two more strips on my quilt (8 down, 14 to go!), a fabric bag using this tutorial and everything except the buttons and sleeves for a JJ shirt (see the photos above and below) You'd think by now I'd have learnt to buy the buttons when I buy the fabric, but nooooo, I didn't, so a trip to a shop to buy some will be needed before I can finish (and wear) the shirt.

Pinning pattern pieces for cutting
Related Posts Plugin for WordPress, Blogger...