Thursday, February 23, 2012

Vogue 2902 - Finished Practice Dress

I showed you how I attached the straps, and now I've had a belt made to match my Vogue 2902 practice dress I can share pictures of the finished dress. I've also included comparison photos of the dress with and without a crinoline underneath.


Sadly despite making a muslin the dress has ended up a bit too big. I need to take it in a little in the front darts to make the waist a bit smaller. It also needs a smidge of length taken out at the bottom of the bodice at the back.


Doesn't the crinoline make a huge difference to the shape of the dress?!


As you can see in the below photos, I need to narrow the straps at the back slightly so that the straps cover my bra straps better at the back. I'm not sure if I should just move the straps, or just take a pinch out of the centre back, since it gapes a little when I push my shoulders back. I'll decide once I've worn it a little more.


I'm also very excited about the belt that I had made. I took my fabric in to Buttonmania and asked for a 1.5" wide belt. The lovely lady that served me then suggested that I get a "double bar" buckle, rather than needing to make holes, as she didn't have eyelets that would perfectly match the pink. I'm really happy she made the suggestion as it doesn't seem to slip through the buckle, and gives more flexibility to  how tight the belt is.


I would highly recommend getting a belt made a Buttonmania, despite it probably costing as much as the dress itself (since the fabric was on sale), I think it makes a huge difference.

Sunday, February 19, 2012

Concentric Hexagons - Finished!


I set the goal of finishing this one before the boy got back from his holiday, and it was finished 11pm the night before he got back, hurrah! The quilt is now living on the boys bed (distinct from me giving the quilt to him, it's just on loan). It's BIG too, at least queen sized (2.1m square), but I haven't actually measured it now it's finished.


I don't know how people sew a whole quilt by hand with a running stitch though. I'm ok with a whip-stitch in English paper piecing, and a blind stitch for the back of the binding, but having to stitch the last 10 inches of binding down on the front by hand was actually really difficult!


The quilt started with some pre-cuts I was gifted a few years ago, and a mini challenge to myself to make something slightly modern out of the traditional style fabrics. Other than the "jelly roll" and "hunny bun" I added two solid hexagons from some matching fat quarters, and then a stack of cream homespun from Spotlight that matched the cream solid in the range. I then bought some matching fabric for the backing and binding. The wadding I used was just some cotton stuff from Spotlight (in a big unlabelled box, bought off the roll). I'm not sure I'd use it again, as it doesn't have much drape, but it's nice and warm.


It's the first full sized quilt that I've free motion quilted, I've only free motion quilted baby quilts before. I'm very proud that I managed it, it wasn't as difficult as I expected, it just took patience with getting the quilt situated so it wasn't pulling.

Bek has asked me for a sort of "how to" of the design process of this quilt, so at some point I will put something together for that.

Friday, February 17, 2012

Tutorial: Jasmine Bias Bound Neckline

Rather than a facing on my jasmine blouse I decided to try putting bias binding around the neckline seam. I don't really like facings, I find that they often fold out annoyingly, or the edge shows through a garment, so tend to prefer to line things or bind the edge.

If anybody knows why facings are supposed to be so amazing, please do tell me, because I'm curious why patterns are such advocates for them, there must be a reason, I just don't know it yet.

Anyway, I thought I would put together a little tutorial of how I added the biased binding to the neckline on the jasmine blouse.


To prepare I made some 1" bias binding, pressing it with my little bias binding presser gadget so the edges were pressed into the centre. I used the scraps left from cutting the blouse pieces on the bias to cut the strips.


I followed the instructions in the pattern up until the "create facing" steps. This left me with the front and back of the blouse sewn together, with the collar basted onto the neckline:


The collar is basted flat onto the raw edge of the neckline:


Then I pinned the bias binding around the edge of the neckline. I lined up one of the folds in the bias strip with the basting seamline


Because the seam allowance at the neckline is 5/8", and the edge of the bias binding is 1/4", you will have about 3/8" of the collar and neckline seam allowance hanging outside of the edge of the bias binding:


Now you need to sew the bias binding onto the neckline. You need to stitch along the fold in the bias binding (so 1/4" from the edge of the binding):


After you've stitched it it should look something like this:


On the inside you should see that your stitching line is hopefully right on top of your basting line (the two black lines in the below picture, the white line is my stay stitching):


Now you need to trim your seam allowance. I trimmed mine to about 1/4" inch, which was nice and easy as I cut approximately along the edge of the bias strip:


Now you need to fold the bias binding back around to the inside of the blouse and pin it down:


When you do this it's important that the collar is sticking out, and that you only pin through the bias binding, and blouse layers, and that the collar is left free.

This step was a bit tricky to get a photo of, but hopefully in the below photo you can see the blouse and bias binding folded together on the left, and the collar out on its own on the right. The seam allowance you just trimmed is enclosed between the bias binding and the blouse.


You then need to stitch along the edge of the bias binding to hold it down - as you can see above, i'm stitching about 1/8" away from the left edge of the bias binding (the right edge was the side I just stitched)

Once you've gone all the way around the inside of the neckline of your blouse will look like this:


And on the outside underneath the collar you'll have a nice neat row of stitching where you stitched down the bias binding:


Which is completely hidden by the collar:


Even at the front:


You can now resume with the pattern instructions from the "attach sleeve cuff" steps, having skipped the "create facing" and "attach facing" steps.

I hope that you find this tutorial clear and useful. If you have any questions please ask them in the comments.

Wednesday, February 15, 2012

Jasmine Fitting Issues

I managed to stitch together the rest of the Jasmine before my machine broke again, but unfortunately there are a fair few. On the surface of it the blouse looks ok. As I mentioned in my last post, the bust measurement is about right, as is the hips, and the waist has about the right amount of design ease.


Despite the fit problems with the blouse, I love the look with the black gingham and really want to get it to work for me, I can see it being a wardrobe staple if I work out the fit problems.

So, in no particular order, the fit problems I've so far identified...

There is a funny poofy thing happening on the back of the sleeve - it's almost as if it's the wrong shape, you can see below. The sleeve sticks out at the back, but behind where you can see it goes smooth-ish against my back. The extra fabric could probably be pinched out.


The sleeves are HUGE! They're a good two inches too large in circumference at least, and probably about 1/2" too long - they hit in the middle of my elbow at the moment, not above it.


The sleeves aren't just too wide down the arm, but the arm hole is way too big, going down too far, meaning the blouse pulls funny when I move my arms:


Also there's a weird wrinkle thing on the centre front over the bust that appears almost instantly, even if you smooth it down. I don't know if i stretched the bias as i sewed it? As it's not caused by lack of ease as there's a fair bit of ease in the blouse on me, and it also happened when Claire tried it on, who is a few inches smaller than me in the bust, although the wrinkles were less pronounced on her.


Lastly the neckline is just too wide for my shoulders - you can see in the above photo that even standing straight it starts to fall off my shoulder and show my bra strap when I'm standing straight, and in the below photo you can see that it starts to gape even more when I'm not standing/sitting straight.


All these issues (bar the bust wrinkles) may be due to the blouse being too big for my frame. (I cut a size 8 above the waist, based on my full bust measurement) So I was thinking that my next plan of attack should be to try making a smaller size and then making a full bust adjustment to the pattern to bring the bust measurement back up to the bust size of the 8. What do you think?

Also, if I try that, how many sizes down should I go? My full bust is about 37" and my "upper bust" 34". That would put my upper bust as a size 2, which is a lot of size differences from the size 8 (especially since the hips need to be a size 10)... Advice? Opinions?

Anyway, other than it not being the right shape for me, there is absolutely nothing wrong with this version of the blouse. I am really happy with the construction and it's finished except for the hem. So, is anybody interested in having it? It seems a shame if it were to just be thrown away. It's a 37" bust, so if you're interested in it please leave me a comment (make sure your email address is included) or send me an email.

Lastly, I didn't do the facing around the neckline, I did a bias bound finish instead. I took step by step photos of it, so if you're interested in how I did it there will be a tutorial on it coming in the next few days. Here's a sneak peek of what the inside of the neckline looks like:

Sunday, February 12, 2012

Not as good as new

So you know how I was excited that my machine was fixed the other day? Turns out it's not :( I'm going to have to call up the shop tomorrow and find out what to do now.


However, mostly due to the generosity of other members of my quilting guild, at my SASD today I finished the quilting on my concentric hexagons quilt and stitched the binding down on the front. Only the hand stitching on the back left to go, hurrah! So a huge thanks must go to Annabel and Bek for their generosity.

Friday, February 10, 2012

As good as new

I've got my machine back, hurrah! I traded shifts at work yesterday so I could get to the shop before it closed and pickup my machine. And this evening I've tried it out, and I'm pleased to report that it seems as good as new. As well a service to clean it out and fix the timing, it apparently needed a new bobbin holder unit.


I didn't want to launch straight in with anything too difficult on the machine (like FMQ), so I have cut out and started stitching what I'm hoping will be a "wearable" muslin of a Jasmine blouse. I'm using some black and white gingham that I traded with my friend Laura, and plan to have a plain black collar. I had traced off the pattern for version 2 the other week (a size 8 above the waist, tapering to a 10 at the hips) so I just needed to cut out the pieces.


So far I have the front and back pieces stitched together, and a quick try on tells me that the size seems to be about right; it seems to be the right size across the bust and hips. It's a bit hard to check the fit without the collar and sleeves though.

I'm glad to have my machine back, that's for sure! Expect more progress soon.

Wednesday, February 8, 2012

In for a service

Quite frustratingly, I haven't got much to show at the moment. I had big plans for this week and next. The boy is on holiday and I was planning to make good use of my spare time by spending some quality time with my sewing machine. 

Sadly, while I was quilting my hexagon quilt last week my machine started running strangely and it became hard to turn the wheel. I decided that it probably wasn't a good idea to keep going while it wasn't behaving so started looking in to taking it in for a service. I took it in on Saturday, and am hopefully going to pick it up tomorrow after work. Apparently something within the bobbin mechanism had worn out and needed replacing. I'm hoping that it will be as good as new when I get it home though.

I have got some sewing done, however, as we had a "crafternoon" on the weekend, and I had a sewing date last night, but unfortunately I'm not quite in the position to share pics of things yet. I have finished my Vogue 2902 dress but need to wait until mid next week until I have the matching belt to show you photos. 


I've made some very good progress on my Beignet, which I've been sewing along with Claire, and should hopefully finish that soon too (although I do still need buttons). So bear with me during this unscheduled break, I will hopefully have some finished things to share with you soon!

Saturday, February 4, 2012

Tutorial: Vogue 2902 - Attaching the straps

I recently bought this Vintage Vogue pattern, which is going to be used for a special occasion later in the year, but after looking at the bizarre instructions for attaching the straps I decided to make up a practice version to have a go at an alternative method.


The pattern has you make up the bodice as if it's strapless, and then to make a fully enclosed tube for the straps part, which is slip stitched onto the top of the bodice on the outside (the top edge of the straps section lines up exactly with the top of the bodice).

I didn't want to do it this way for three main reasons:
1) I didn't want to trust or do that much hand stitching on it
2) If you do the straps in a contrast fabric and there is any slight gape when you move you'd see the bodice fabric on the inside of the neckline rather than the contrast.
3) Any visible hand stitches would be very noticeable with the fabric I'm likely to end up using for the "real thing"

Anyway, I came up with another method for attaching the straps that I think worked really well, so I thought I'd share it. It does still have a little hand stitching, but it's not integral to holding the dress up, and isn't visible. It does however solve the contrast at the neckline point.

The bodice was stitched together as per the instructions.

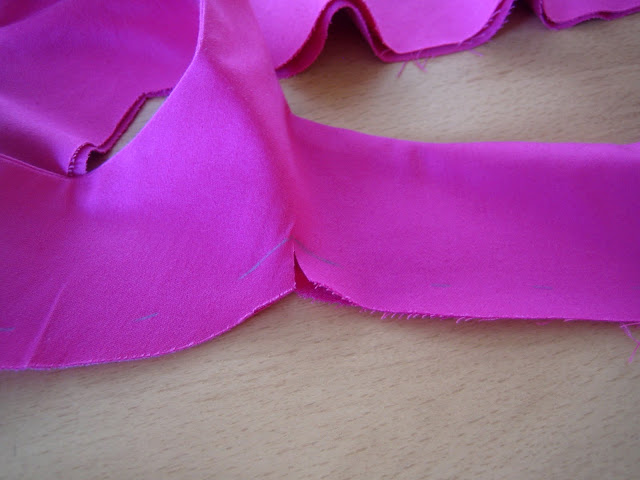
I stitched the straps section together as instructed EXCEPT I did not stitch along the bottom of the straps, as shown here:


Then I went about folding up the seam allowance along the bottom of that piece. The first method I thought to use was just to mark the seam allowance and fold it up like so:


However it's actually quite tricky to get a nice smooth curve doing this method. A slightly better method is to do a line of stitching just inside the seam allowance along the line you want to fold:


You can then fold just to the inside of this line of stitching and you get a much smoother curve:

I would suggest folding a slightly larger seam allowance on the inside of the band than the outside.

Once I'd folded and pressed the seam allowance on both sides of the band I stitched the INSIDE of the band to the bodice by machine. I pinned the band to the machine, lining the top of the bodice up with the top of the band, with the band enclosing the bodice, and stitched along about 1/8" from the edge of the bodice band.


 Importantly, this line of stitching must be inside the size of the band on the outside to keep the stitches invisible from the outside. This is why I suggested making the inside seam allowance larger.

There will now be a line of stitching along the top of the bodice holding the inside band in place, which will then be covered up by the outside of the band.


The last step is to stitch the outside band down invisibly by hand. Doing a slipstitch along the edge of the fabric is the 'obvious' way of doing it, but after doing a couple of inches of this I decided that it was still too visible, so I folded back the first 1/8" of the band and did my line of stitches just under there (just inside my line of stitching from before, being careful not to catch the outside layer of the band and only the seam allowance):


When you let go of the folded back bit and let it sit flat your stitches are completely invisible. Here is a comparison of the two stitch types.

Normal slip stitch on edge of band:


My method folding it back slightly and stitching only the underneath layer:


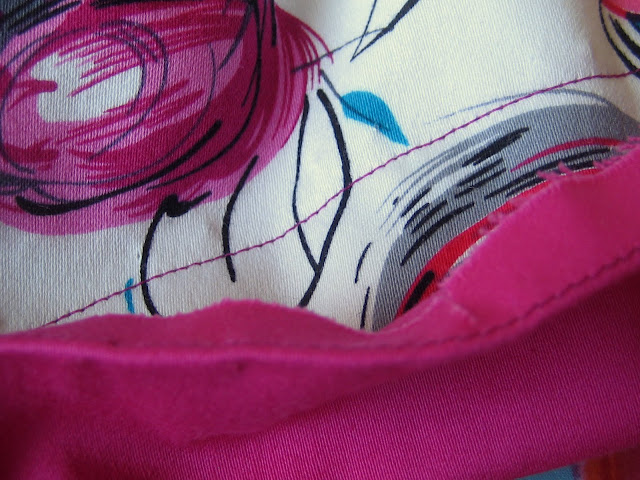
Here's a peek at what the finished band looks like:


I hope those instructions are clear. If you have any questions please feel free to ask them in the comments and I'll to my best to answer them.

I'll share pics of the whole dress once it's finished - I still need to put in the zip and hem it.
Related Posts Plugin for WordPress, Blogger...