Showing posts with label Pre-cuts. Show all posts

Wednesday, July 25, 2012

Mini-Tutorial: Concentric hexagons

When I finished my concentric hexagons quilt Bek asked me how I had pieced the top and if I could post a tutorial. I've been meaning to post a mini tutorial since then, and I've finally got a chance to put one together.

The pieces hexagons were all made using two sets of pre-cut strips - a jelly roll and honey bun. A jelly roll is a set of strips that are 2.5" wide and the length the width of the fabric (~44"). A honey bun is strips 1.5" wide and the same length.

I spent a little while working out how many strips to piece together to make best use of the two kinds of strips I had and to get the least wastage. I worked out that a finished width of 5.5" (5" finished) was ideal as it gave almost exactly 12 triangles with only a little bit of waste but enough leeway if the ends of your strips weren't quite exactly even. Thus, each set of strips makes two different hexagons (the order of the strips is reversed between the two).


So the first thing I did was sort my strips into sets. I did this rather than sew them together as I went as I wanted to split my strips into the different colours, so sorting them first allowed me to make sure that I had the combinations that I was after.


The strips were sorted into any combinations that added up to 5" finished (eg 2x2.5" + 1x1.5", or 1x2.5"+ 3x1.5", see diagram above) and stitched together with a 1/4" seam allowance. Then the sets of strips are cut into the 12 equilateral triangles (see diagram below). My ruler has a 60 degree line marked on it, so I used that line as a guide for cutting the triangles. You could also use an equilateral triangle ruler/template.


I then stitched the two sets of 6 matching equilateral triangles into sets of three "half hexagons". Once you have all your triangles stitched into half hexagons you're ready for planning the quilt layout.


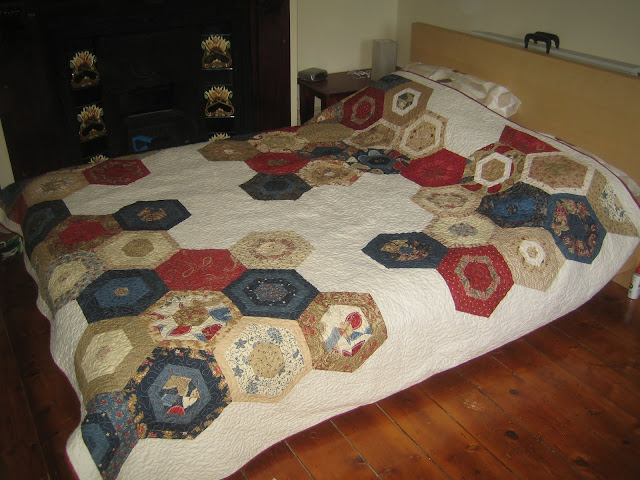
To plan the layout I just found a space big enough to lay out the half hexagons (which is actually a bit bigger than the finished quilt as the seam allowances haven't come out yet). In my case I used a bed (plus a bit). I laid out the half hexagons, leaving space where I was planning on adding my "negative space" background fabric.


Once you've decided on your layout you'll need to cut out the background fabric for your negative space. That's nice and easy! For the small areas you need to measure your half hexagons and cut some half hexagons of your background fabric. For the larger areas I cut strips, with the end cut at a 60 degree angle and then cut them to the correct length.

To assemble the quilt top you first need to join the strips of half hexagons (which on my quilt above runs horizontally across the photo), and once you have the strips pieced, join all the strips together into one big piece. For my quilt I then added a border of the background fabric all the way around, wider at the sides than the top and bottom to make the quilt squarer.


Let me know if you have any questions, and if you make anything using this tutorial please do share piccys with me!

Sunday, February 19, 2012

Concentric Hexagons - Finished!


I set the goal of finishing this one before the boy got back from his holiday, and it was finished 11pm the night before he got back, hurrah! The quilt is now living on the boys bed (distinct from me giving the quilt to him, it's just on loan). It's BIG too, at least queen sized (2.1m square), but I haven't actually measured it now it's finished.


I don't know how people sew a whole quilt by hand with a running stitch though. I'm ok with a whip-stitch in English paper piecing, and a blind stitch for the back of the binding, but having to stitch the last 10 inches of binding down on the front by hand was actually really difficult!


The quilt started with some pre-cuts I was gifted a few years ago, and a mini challenge to myself to make something slightly modern out of the traditional style fabrics. Other than the "jelly roll" and "hunny bun" I added two solid hexagons from some matching fat quarters, and then a stack of cream homespun from Spotlight that matched the cream solid in the range. I then bought some matching fabric for the backing and binding. The wadding I used was just some cotton stuff from Spotlight (in a big unlabelled box, bought off the roll). I'm not sure I'd use it again, as it doesn't have much drape, but it's nice and warm.


It's the first full sized quilt that I've free motion quilted, I've only free motion quilted baby quilts before. I'm very proud that I managed it, it wasn't as difficult as I expected, it just took patience with getting the quilt situated so it wasn't pulling.

Bek has asked me for a sort of "how to" of the design process of this quilt, so at some point I will put something together for that.

Monday, January 23, 2012

Basted Hexagons

I have made great progress in the "concentric hexagons" quilt project I started a while ago using the pre-cut fabric kindly gifted to me. I had made up all the half hexagons at my retreat back in November, and I took them with me to Perth at Christmas to work on the final layout of the quilt. While I was there I stitched together the half-hexagons into rows, and at the MMQG SASD I stitched the rows together and the borders around the outside... except when I got home I realised that I had put the borders on the wrong edges, and rather than making the quilt square had succeeded in making it more rectangular! oops! I spent some time this evening unpicking the borders and re-sewing them back onto the correct sides, and thus finally finishing the quilt top:


I had decided for this project to challenge myself to try and make something with a modern aesthetic despite using the very traditional styled fabrics. The key to my "vision" was negative space, which was filled perfectly by some homespun from spotlight in pretty much exactly the same colour as the solid cream in the range.

What do you think? Am I on course for making a "modern" quilt from the "traditional" fabrics? 

One of the fat quarters had the name of the range on the selvage, which meant that I could look it up and managed to buy some on the internet from Lonestar Quilting for the backing and borders. The range is Wiscasset by Moda, and I chose this large "cheater quilts" print for the backing, because I quite like the print and it was completely lost having been cut up for the hexagons. I particularly like how it's got several of the prints from the line within its design.


After finishing the quilt top, the rest of my evening was spent basting the quilt (in the sanctuary of my air conditioned living room). I intend to machine quilt this one, so I had intended to spray baste it, but forgot to buy more spray. Since I had the evening free, rather than wait until I have some spray I decided to pin baste it instead. Hopefully the pins won't be too much of a pain when it comes to the machine quilting (I'm planning to free motion quilt it), I've only used pin basting for hand quilting so far.


Lastly, I'd please like some opinions on what colour bobbin thread to use when quilting. I have some cream that matches the solid for the top, and was probably thinking Navy for the bobbin (ie back). The tension when quilting is pretty good on my machine, so it's unlikely to show through to the front but it's possible.... What would you use?

Tuesday, November 8, 2011

Retreat 2.0

This past weekend I headed up to hepburn springs again for another retreat. We had such fun on the last retreat back in May that we booked in for another, even longer, one while we were still there. This time we stayed 3 nights, and it was lots of fun and incredibly productive.


I got lots of sewing done, including assembling the blocks for two quilt tops. Above are the base blocks for the quilt I am making with the spotty sateen fabric I bought earlier in the year. The blocks have since been cut into quarters bento box style, and the quarters trimmed to 8" square ready to be assembled into a quilt top.


Below are the rest of the hexagons that I started on the other weekend, and I love how they look, piecing them together has definitely transformed the fabric. I just need to get some solid cream fabric and I will begin assembling the quilt top of this one too.


This means that soon I'll have some quilting projects on the go again, which i'm excited about. I'm planning on hand quilting the spotty one, although don't exactly know what design yet, so suggestions gratefully received.  In contrast I'm considering machine free motion quilting the hexagon one, probably just with a stippling pattern, however as i'm hoping the quilt will be about queen sized I may regret that decision and change my mind with either the quilting method or design.


I did get some other stuff done over the weekend, about which I shall blog in due course.

Saturday, October 29, 2011

Something New...


I haven't done much sewing lately. Partly because initially I wasn't really in the mood, but then as my retreat grew closer (next weekend, hurrah!) I kind of felt like I shouldn't be working on things but that I should "save" them for the retreat, which is just plain old silly! So last night I sat down and bit the bullet and started something new just because.


I made a decision and started sewing with the pre-cuts that my gran and Jo had given me for Christmas quite a while back now. I have a jelly roll (2.5" strips), a honey bun (1.5" strips) and a charm pack (5" squares) and then two coordinating fat quarters. So far I'm working with the strips. Sewing them together and cutting them back up again into triangles, which I'm sure you can guess, will become hexagons:


I'm not sure how it's all going to work out, the design is still forming in my mind. I think I'm going to need to buy a little more fabric to make the quilt a useable size, and I'd quite like to try doing something a bit unexpected with it... but I'm going to finish making these units and see how they look before I decide.

Sunday, December 27, 2009

Jelly Roll Plans...

This afternoon I've been perusing flickr to get ideas of what to do with my jelly rolls and charm pack. I've made a temporary "design wall" in my living room where I've laid out all the fabric so I can see what I have.

(image is clickable to see it larger)

From the jelly rolls half of the fabrics are beige based and the other half red and blue. Also half of the strips will yeild 2" stripes and the other half 1" stripes. The charm squares are all a bit darker than the strips, but with similar tones so can hopefully be used together well, although I am concerned about the almost black squares.

Despite being somewhat limited by what fabric I have (in regards to the strips and squares) there's an awful lot of patterns I could choose to use, including Log Cabin, Bento Box, Cathedral Steps, Rail Fence, Double Hour Glass, Coins and heaps of others that I'm less drawn to. Then once I've chosen my design there's even more choices for which colours to use where and then the chosen layout for the whole quilt. I could even do some kind of mixture of different designs.

Far too many decisions for someone as indecisive as me!!

Saturday, December 26, 2009

Thanks Gran & Jo!!!

Before I continue posting the gifts I made for other people I wanted to show you what my Gran and Jo gave me for Christmas.


Two jelly roles, some charm squares and two fat quarters of various Moda fabrics.


Now I need to decide what to make with them. I'm already having fun running ideas through my brain, especially since I've never made anything with jelly rolls or charm squares before.

So Thanks again Gran and Jo, it's a great gift and I'm looking forward to using it.
Related Posts Plugin for WordPress, Blogger...