Showing posts with label Pyjamas. Show all posts

Monday, January 5, 2015

Two new PJ bottoms

Carrying on with catching up on un-blogged projects, today I am sharing two pairs of pyjama bottoms that were added to my sleeping wardrobe during 2014. Both pairs were made from fabric that the Darren brought me back from Japan.

The first pair was made using the pattern that I've used a few times before (that originated from cutting apart a dead pair of PJs and tracing off the pattern back in 2006 and has been modified many times since then). This time I added a little bit of extra width through the hips and larger patch syle pockets (rather than the slash pockets that I have written a tutorial for here).


They were also the first item that I made with my overlocker, and I was a little over keen with the use of the overlocker when I probably should have used my sewing machine. Some of the seams around the waistband are now coming apart a little. That's not stopped me from wearing them though, although I should get around to fixing them so they last longer.


For this second pair, I used the pattern that I'd used for the dinosaur camo pants, as I have since decided that they're more comfortable than the PJ pattern that I'd previously been using. I used the same super-sized pocket pieces as with the dinosaur camo pants (which are about the same size as an A4 piece of paper) but again did them as a patch style pocket. I have taken to doing them this way as there is no pocket bag to bunch up inside the PJ bottoms.


Pattern: Self-made
Fabric: Cotton (feels a bit like quilting cotton) from Japan
Notions: Thread, 1" ribbed elastic

Sunday, April 29, 2012

Pyjama Party!

This weekend is the time to post creations for the pyjama party. I have made two pairs of PJs in the last couple of weeks, so have saved posting both of them for today.

They're both spotty, the first big spots on a teal background. The photo also features the raspberry and white chocolate muffins (I use this recipe but use sunflower oil as I'm allergic to peanuts so peanut oil wouldn't end particularly well!). It turns out the oven in our new place has a very reflective door, and while I was actually trying to photograph the muffins, the pyjama bottoms came out clearer:


The second pair are the ones that I made when writing my PJ pockets tutorial:


I have worn both pairs already and they're super comfy :)

Another part of the pyjama party is to share what you're reading at the moment. I am currently reading "A Dance with Dragons", which is the 5th book in the Song of Ice and Fire series that the tv show "Game of Thrones" is based on. I'm veeeery close to the end of it, it's taken me a while to get through, it's a Monster! I'm also currently listening to "At Home: A Short History of Private Life" by Bill Bryson, my April download using my Audible subscription (which I plan to talk about another time).

Anyway, I'm going to head on over to the pyjama party and take a look at everyone else's creations, will you join me?

Friday, April 27, 2012

Tutorial: Pyjama Pockets! - Part 2

I posted part 1 of this tutorial, how to draft the pockets, the other day, and here is the second part

How To Sew The Pockets.

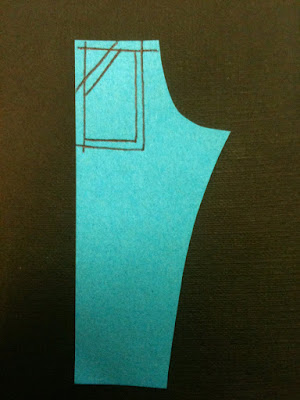
After you've altered the pattern to draft the pockets you need to cut out your pattern pieces. You'll need:
- Pyjama Front Leg (x2)
- Inside Pocket (x2)
- Pocket Back (x2)
- Pyjama Back leg (x2, not pictured)


(as I ran out of PJ fabric my pocket back has a "patch" of the print on the top corner where it's visible and the rest is in a plain poplin, hopefully this won't confuse you)

First you need to sew the pocket back to the inside pocket pieces. Place the inside pocket on top of the pocket back, right sides together:


And sew along the bottom and centre most sides, as indicated in pink here:


Once you've stitched, also finish the edges. If you want you could also sew these two seams as french seams.


Now turn it over and fold back the pocket back:


Now turn it back over and line up the diagonal edge of the inside pocket with the diagonal line on the PJ front leg piece:


The fabric will be right sides together, with the pocket back folded out of the way in between the two. Sew along the diagonal line (marked in pink below) and finish the edge:


If you fold the pocket back round to the inside of the PJ front piece you'll start to see your pocket take shape:


Press the diagonal seam you just stitched. I like to topstitch mine to hold the edge of the pocket nice and flat. Usually with just one line of stitching, but here there are two:


Now you need to baste the edges of your pockets to the edges of the PJ front pattern piece to make it easier to sew the PJs together. Where you need to baste is shown here in pink:


Now you should have a PJ front leg pattern piece with a pocket that can be treated the same way as if it didn't have the pocket there:

I assemble my PJs by sewing together the two front pieces at the centre front seam, and then the two back pieces at the centre back seam, and then sewing the front to the back at the seams along the inside and outside of the leg.

The last step is to attach the casing for the elastic. I do this step slighly differently to how i've read instructions to do it, as I find it gives me more flexibility with altering the length of the elastic after assembling the PJs.

I cut a strip of the fabric double the width of the elastic plus 2x seam allowances - so for 2cm elastic (a good width for this I think) and 1cm seam allowances, I would cut a strip a smidge over 6cm wide (2x2cm + 2x1cm = 6cm).

Next fold the strip in half length ways and pin it to the top of the pyjamas, lining up the raw edges:


At the point where the ends of the two strips join (I usually line this up with a side seam) I fold back the ends inside of the strip so that they meet but the raw edges are enclosed:


(It's a little hard to describe, hopefully the pictures make sense)

Then you need to sew the band to the top of the pyjamas and finish the raw edges.

Next, it's best to top stitch just below the seam, so the seam allowances stay facing downwards (towards the legs, away from the waistband):


Last, thread your elastic through the casing and adjust it to the desired length. You can then hand stitch the tiny opening in the waistband closed, but I tend to wait a few uses to make sure I'm happy with the elastic length - I've found that it's often too loose to start with and I want to tighten it.

As well as this increased flexibility in working out the elastic length, I prefer sewing the waistband like this and leaving a small section to hand sew closed, rather than the normal way of sewing the waistband into a tube and then leaving a gap where you've not attached it to add the elastic as I find it's easier to do than to pull the unattached bit flat with elastic in it.

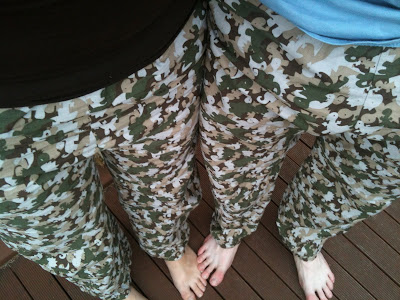
Anyway, all you have left to do now is try on your PJs to check the length and hem the bottom!


Look! PJs, with pockets:


I hope that this tutorial has been of use. If you have any questions please ask them in the comments and I'll do my best to answer them.

Friday, April 20, 2012

Tutorial: Pyjama Pockets! - Part 1

After buying my PJ fabric last weekend I told my friend Claire that I'd put together a tutorial for how I add pockets to my pyjamas.

You're probably thinking at this point why on earth would I add pockets to my pyjamas, but personally I think once you've had some with pockets you never go back!

Now granted, I don't just use my PJs for sleeping, I often wear my pyjama bottoms around the house if I want something comfy to wear and a pocket for my phone and such is very handy. I'm also a self professed pocket addict - if I can add pockets to something I will, so it was inevitable really.

The first pair with pockets I made had in seam pockets in the side seams, which was good but found the pockets bunched a bit. Since then I have added "slash" pockets (is that the right term?) to all my pairs and have slowly refined the size that I prefer.

Anyway, in keeping with the PJ theme in the blogosphere at the moment I thought I'd  speed up getting the tutorial written. I've decided to make my tutorial into two parts - first drafting pockets for your pattern, and secondly how to sew them up.


To add this type of pocket you will need to have a pattern that has a side seam down the outside of the leg. If your pattern is all one piece like Karen's you either can't make the pockets the way I do, or you'll need to add a side seam. You'll also need to use a separate waistband piece rather than just folding over the top of the leg piece for the elastic/drawstring casing, or it can get a bit bulky where there are extra layers for the pockets.

Drafting the pockets


Lets get started! You'll need your front leg pattern piece. Here is my little fake pattern piece made from a post-it to show you the steps:


Next measure in from the edge the distance of your seam allowances to mark the stitching lines along the top and upper section of the side seam:


Now you need to mark the diagonal line of the top of the pocket. I have found that I like my pocket opening to be about 5.5-6" wide. So I draw a diagonal line that is that long between the marked stitching lines - about 3" across and 5" down:


Next we will mark how big the pocket will be. I've made the mistake of making some waaay too small in the past but think I've now settled on a good size of 6" x 8.5". That's a good size for me. When I made the PJ bottoms for the boy he requested REALLY BIG pockets and I made them 7" x 10", which was basically the size of an A4 piece of paper.

Measure the pocket dimensions you want and mark them onto the pattern piece:


Then go around the lines you just drew and add seam allowances on to the bottom and central side of the pocket and above the diagonal line:


Now we need to cut the extra pattern pieces we need for the pocket. First we'll cut the back of the pocket, which is essentially a big rectangle, possibly with a slightly different shape along the top depending on the shape of your pattern piece (mine slope slightly down towards the centre front). To do this, trace around the top and outside edge of your pattern piece, and then along the side and bottom of the pocket (including seam allowance) that you have drawn onto the pattern piece:


As this piece is probably almost a rectangle, I strongly suggest marking the direction/top of the piece. Also label it as "Pocket back", and add other labels such as the seam allowance size, grain line and how many to cut (2).

Next cut along the upper/outside diagonal line on the pattern piece, cutting a triangle off the corner as shown:


Now repeat the process of how you traced the first pattern piece for the pocket except this time the rectangle will have a corner chopped off. You can do this either exactly the same way as before. Alternatively. a slightly easier way is to copy the pocket piece you made before, place it under the PJ front pattern piece, lining up the top and the edge, and then copy off the line to cut the corner off:


This is your "inside pocket" piece. Again I suggest labelling it up like the other one, you'll need to cut two of this one too.

You should now have three pattern pieces where you once had one:


They go in the order pocket back, inside pocket, PJ Front as shown:


I hope that all makes sense. If you have any questions please ask them in the comments and I'll do my best to answer

Stay tuned for the second part of my tutorial, which will cover how to sew them together into pyjamas.

EDIT: Find part two here

Friday, April 13, 2012

Perfect timing!

It turns out my purchase of PJ fabric was perfectly timed, as there is a Pyjama Party being hosted by Karen of Did you Make That.


Maybe you should join in with the Pyjama Party too! the Pyjamas are due to be revealed on the 28th of April.

Saturday, April 7, 2012

Pyjamas!

Easter weekend means sales at the fabric stores, so this afternoon me and Claire popped across to Spotlight as they had 40% off all fabric. I have been in need of some new PJs for a while, especially since I was generous and used half of the dinosaur camo fabric to make a second pair for the boy rather than a pair for myself.


I was very restrained, and only bought what I went for. I bought three pieces of fabric, which totalled about $30 including elastic, so $10 a pair of PJ bottoms isn't bad. The birds are flannelette, and the spots are poplin. Once they're made up I'll be able to get rid of some that are getting very very sad!

Sunday, March 11, 2012

Dinosaur Camo Pants!

Do you remember the dinosaur camo fabric that I got a while back?


Well, I made the intended dinosaur camo pants out of it for the boy for Christmas I just hadn't had a chance to share them.


I traced off the shape of some scrubs trousers that I have to make a pattern, and added pockets (I was briefed to make the pockets big, so I made them the size of an A4 piece of paper, and was told they were too small, go figure!)

I have since made a second pair, with some minor modifications. Not entirely selfless though, as it means I can steal a pair if I need something to lounge around in :) It's not too sad to be wearing matching PJ bottoms is it?


Lastly, a quick note on my blogging activity - you may have noticed that posts around here have been a bit thin on the ground lately. That's due to a combination of working on things that I can't share on here yet, and also my life being a bit crazy busy at the moment (I'm moving soon, exciting!). Hopefully things will be back to normal around here in a few weeks time.

Monday, December 28, 2009

Summer PJ Bottoms

Overcoming my indecision from the other day I've since whipped up two pairs of summer PJ bottoms with the fabric I bought a while back.


I used the PJ bottoms pattern from my argyle PJs with a few small alterations:

- Shortened them to 3/4 length & added a kind of cuff to the bottom.

- Changed the style of pockets to ones inspired by some PJs I saw in Bras n Things.

- Added some extra height to the back for comfort (and modesty).

- Altered the waistband to be a nice chunky one and left out the drawstring.

I also added some contrast trim to the edge of the pockets and between the main trouser leg and the cuff.

Friday, December 25, 2009

Colour Indecision...

Launching straight into sewing for me now Christmas is over I'm working on a pair of PJ bottoms. However, indecision has struck; I want to add some coloured trim to the edge of the pockets and near the hem at the bottom of the legs but I'm being indecisive on the colour. Help?


Pink, Green or Blue?

The blue and green are poplin and the pink is drill (so might be a bit heavy...?). I don't know which one to choose and I can't really proceed with the PJ bottoms until I have. Opinions?

Christmas Gift: Smiley PJs

For my brother for Christmas I made a pair of Smiley PJs out of some fantastically fun jersey fabric I found at Spotlight.


For the top I used the basic T-shirt pattern from "sew u home stretch" in Large but with 3" added to the bottom to make it long enough for Marcus' 6'4" height. If I were to make it again I would also have added some length to the sleeves, as they're really very short. Actually, if I had been making anything I would expect him to wear out of the house I would have added at least 2-3 inches to the sleeves.


As you can see I used the red from the bottoms for the neck band. I thought the Smileys might stretch out if I used it and didn't want to risk it.


The bottoms were from Simplicity pattern 3947, which is my standard 'PJs for Marcus' pattern now. I made a Medium but using the long length. I love this pattern as it has pockets; In my opinion all PJs should have pockets. I altered the waistband slightly so that it had a separate part made with the contrasting smiley fabric containing some nice chunky elastic (1" wide I think).


For the various hems I used a double needle which made it turn out really well (although I think I need to buy a new double needle as it missed a few stitches).


Marcus was also the lucky recipient of a superbly and lovingly cooked Christmas dinner (even if I do say so myself). We had a full roast with all sorts of different veges, lamb for me and a vegetarian thing for him, complete with perfectly cooked Yorkshire Puddings of course! Too stuffed to manage desert we've decided to save that for tomorrow.

I hope everyone else had an enjoyable and hopefully relaxing Christmas!

Saturday, August 15, 2009

One UFO down...

The task I set myself this weekend was to tackle my UFO box, so settling down in front of some trashy movies this evening I set to work. Sadly, the first UFO I ran out of the right colour thread half way through working on the first one, so it's back in the box. Happily though, the second is finished and already being worn!


I introduce to you my newest pair of PJ bottoms! They are super comfy and made from the same pattern as my argyle PJ bottoms. However they do look like they're made for someone a great deal taller than my humble 5"4... I may need to re-hem them!

There's a matching PJ top still waiting to be made, rather experimentally the pattern was traced from a PJ top I own, so we'll see how that turns out!

Friday, July 10, 2009

Warm and cosy at last.

I'm having a crazy week. After my week off I've launched head first back into work, whilst also watching Le Tour every evening. However before all of that I managed to finish off my quilt.


The biggest quilt I've made and thus the biggest quilt I've quilted, it was hard work moving it around. However, I breezed through the quilting quite happily, doing a basic stitch in the ditch around each of the 4" squares.

I decided to make the binding quite wide one rather than narrow like last time, so measured it up so that the binding was the same width as the white strips (3/4 of an inch). I then quite happily stitched the binding on all the way around, following a tutorial for mitred corners... but discovered when was stitching the binding round onto the back that I should have done the corners slightly differently, as I hadn't allowed enough fabric in the fold of my corner to make a nice square corner. As I discovered this after I had sewn the binding on all the way around and started hand stitching the back I decided to deal with it, and now my corners are slightly rounded rather than nice pointy corners.


Hand stitching the binding on the back took AGES. And by ages I'm not exaggerating. I started the hand stitching at about 7:30pm on Saturday night, cosy under the quilt sat on my couch watching TV stitching away. Excluding a break for some food and a few other small distractions, I finished at about 2am, at which point I gave up on the opening stage time trial of Le Tour for some sleep. I followed the comment posted by Aneela on her blog about using a blind hem stitch rather than a slip stitch, and agree wholeheartedly that it is much better! However, if anyone has any tips for speeding up hand stitching, please share them with me!

I'm definitely still not loving the quilt. I don't hate it, but I certainly don't love it. However, I've been sleeping under my quilt (and my blanket and duvet) ever since finishing it, and have been super cosy every night, so it's a success in that regard!


Now that's finished I can regain focus on some other projects. I cut out my pyjamas, using the pattern for the bottoms that I made a short while back and then used the top from a pair of PJs (from Myer) to draw up a pattern for the top. Hopefully it'll all work out when I get around to sewing it together.

And to finish this post; something I was coveting in Big W the other day:
Related Posts Plugin for WordPress, Blogger...