
You're probably thinking at this point why on earth would I add pockets to my pyjamas, but personally I think once you've had some with pockets you never go back!
Now granted, I don't just use my PJs for sleeping, I often wear my pyjama bottoms around the house if I want something comfy to wear and a pocket for my phone and such is very handy. I'm also a self professed pocket addict - if I can add pockets to something I will, so it was inevitable really.
The first pair with pockets I made had in seam pockets in the side seams, which was good but found the pockets bunched a bit. Since then I have added "slash" pockets (is that the right term?) to all my pairs and have slowly refined the size that I prefer.
Anyway, in keeping with the PJ theme in the blogosphere at the moment I thought I'd speed up getting the tutorial written. I've decided to make my tutorial into two parts - first drafting pockets for your pattern, and secondly how to sew them up.
To add this type of pocket you will need to have a pattern that has a side seam down the outside of the leg. If your pattern is all one piece like Karen's you either can't make the pockets the way I do, or you'll need to add a side seam. You'll also need to use a separate waistband piece rather than just folding over the top of the leg piece for the elastic/drawstring casing, or it can get a bit bulky where there are extra layers for the pockets.
Drafting the pockets
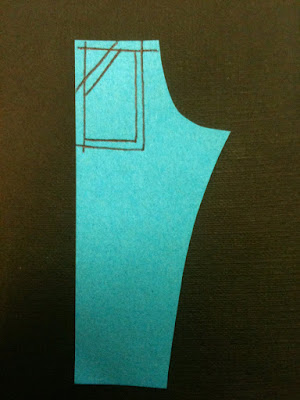
Lets get started! You'll need your front leg pattern piece. Here is my little fake pattern piece made from a post-it to show you the steps:

Next measure in from the edge the distance of your seam allowances to mark the stitching lines along the top and upper section of the side seam:

Now you need to mark the diagonal line of the top of the pocket. I have found that I like my pocket opening to be about 5.5-6" wide. So I draw a diagonal line that is that long between the marked stitching lines - about 3" across and 5" down:

Next we will mark how big the pocket will be. I've made the mistake of making some waaay too small in the past but think I've now settled on a good size of 6" x 8.5". That's a good size for me. When I made the PJ bottoms for the boy he requested REALLY BIG pockets and I made them 7" x 10", which was basically the size of an A4 piece of paper.
Measure the pocket dimensions you want and mark them onto the pattern piece:

Then go around the lines you just drew and add seam allowances on to the bottom and central side of the pocket and above the diagonal line:
Now we need to cut the extra pattern pieces we need for the pocket. First we'll cut the back of the pocket, which is essentially a big rectangle, possibly with a slightly different shape along the top depending on the shape of your pattern piece (mine slope slightly down towards the centre front). To do this, trace around the top and outside edge of your pattern piece, and then along the side and bottom of the pocket (including seam allowance) that you have drawn onto the pattern piece:

As this piece is probably almost a rectangle, I strongly suggest marking the direction/top of the piece. Also label it as "Pocket back", and add other labels such as the seam allowance size, grain line and how many to cut (2).
Next cut along the upper/outside diagonal line on the pattern piece, cutting a triangle off the corner as shown:

Now repeat the process of how you traced the first pattern piece for the pocket except this time the rectangle will have a corner chopped off. You can do this either exactly the same way as before. Alternatively. a slightly easier way is to copy the pocket piece you made before, place it under the PJ front pattern piece, lining up the top and the edge, and then copy off the line to cut the corner off:

This is your "inside pocket" piece. Again I suggest labelling it up like the other one, you'll need to cut two of this one too.
You should now have three pattern pieces where you once had one:

They go in the order pocket back, inside pocket, PJ Front as shown:

I hope that all makes sense. If you have any questions please ask them in the comments and I'll do my best to answer
Stay tuned for the second part of my tutorial, which will cover how to sew them together into pyjamas.
EDIT: Find part two here

No comments:
Post a Comment
Comments make me smile :)