Wednesday, October 31, 2012

Whole Wheat - Gauge Swatch


After finishing my Miette Cardigan I was so happy with it that I've decided to move onto another cardigan project. So, one day after work I took another trip to Morris & Sons and exchanged the two leftover balls of yarn from my Miette and bought some lovely merinogold yarn in pale blue, to make a Whole Wheat cardigan.


When I got home I bought the pattern online, and over the weekend started knitting a gauge swatch...


This gauge swatch really highlighted the difference before and after blocking. Above is before, below is after...


I'm happy with the gauge, and even happier with the texture of the pattern!


This cardigan uses very different techniques to the Miette that I've never tried before. It's knit as flat pieces that are seamed together at the end. The pattern is also written very differently - much less 'spelled out' than the Miette. Wish me luck with working out how to do it all!

Sunday, October 28, 2012

My Month in Instagram...

I love Rachel's Instagram wrap-up posts so thought I'd do one of my own to share what I've snapped. I don't have enough pics to post every week, but here is my last month on Instagram...


If you want to add me, my username over there is maiestia.

Do you have instagram? If so, what's your username? I'd love some new people to follow...

Friday, October 26, 2012

Guest Post at SewSquirrel

Guess what! Today I have my first ever guest post over at SewSquirrel!!

You should hop on over and take a peek at what I had to say. And while you're there you should check out Sarah's other posts, as she's one super talented lady, and super lovely too, I feel very lucky to not only get to read her blog but to spend time sewing with her in real life (gasp!) too. Oh, and did I mention that she sells independent patterns? And she ships free within Australia too!

What're you waiting for, head on over!

Wednesday, October 24, 2012

Miette - Finished!!


Guess what I finished last weekend?? Yup, that's right, my Miette!! And since Claire and Mindy were kind enough to assist me as photographers I have some pics to share too.


The knitting portion had been finished for a bit over a week, and the cardigan was just waiting on buttons. I bought some buttons that blend in with the yarn, and also added some ribbon to the back of the buttonband that has the buttons on it.


Hopefully the ribbon will stabilise the front of the cardigan. I wasn't sure about adding it to the button band with the buttonholes, so have left it off for now and will see how it goes.


Overall I'm really happy with the cardigan. I love how simple it is, but also really like the lace detail that stops it from being boring. The fit is pretty good. It probably could have done with being a smidge bigger (there's a fair bit of negative ease!). The shoulders look a bit lumpy in these pics, but that's not the cardigan it's because of the sleeves on the dress I'm wearing under it.


If I were to knit up this pattern again I think the only thing I'd change is to start the bust decreases about an inch lower than they are on the pattern - they start a bit too high on me I think. I'd also possibly consider adding one more repeat of the lace to add a couple more inches in length, but i'd have to decide on that after seeing how wearable this one is at this length.


In case you're wondering if I went back and fixed the sleeve lengths - I did! Below is a pic of the very scary process of cutting off the cuff (easier as I'd already weaved in the ends), ravelling back and picking up the stitches again. I cut the shorter sleeve and re-knitted it to match the length of the longer one.


And just to finish this post, I wanted to share a couple more of the pics taken during this photoshoot. Encouraged by my friends behind the camera to try some silly poses, I channeled my inner Amanda as best I could...


Nowhere near as crazy as some of her photos but a galant first effort I think.

(apologies if this has appeared in your feed again, and for the lost comments, I accidentally deleted the post)

Tuesday, October 23, 2012

Prints Framed and Hung

Do you remember the Cate Parr watercolour prints I was trying to choose back in June? Well I finally made a decision and bought the prints in September. I have since gotten them framed and onto the wall...


Yes, I went with option 2 in the end. But there was MUCH deliberation. They're now on the wall above my desk in my room, the little corner that makes my little sewing area. I love how they look on the wall, it was exactly what I was after.


I wanted to take a moment to share the amazing place that I ended up getting the frames from. The shop is called "Frames Readymade" and is 352 Lygon Street, Brunswick East. They're only open Thurs-Sat 10-14, but it turns out that's because they make the frames on site. They have a great range of frames, and the staff are super helpful.

I got some standard size frames, but I had to get one mat custom cut (for the bargainous price of $8!) for the print of the hands/dandelions as it's a bit taller than the other two. My boyfriend also got some frames there, including one that was custom sized that ended up costing half the price of the other quote we got, and the service was infinitely better.

If you're in Melbourne and are in the market for any frames I highly recommend trying out Frames Readymade. Overall I'm a very happy camper, both with my superb art and the frames that the prints are contained in!

Monday, October 22, 2012

DUDQS3 - Quilt Recieved!

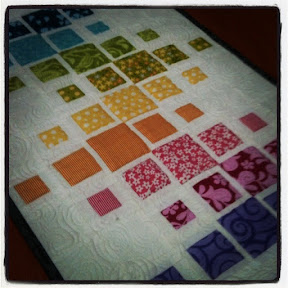
I shared with you the quilt I made for the DUDQS3 last week, but today I am very excited to share the quilt that I received.


My quilt was made by the very talented Kelli. Just look at that quilting! Isn't it stunning!! I absolutely love it!


Kelli has left the coloured squares un-quilted and they really pop.


It's going to look beautiful on my wall!!


Thank you so much Kelli, I really do love it!


PS: Are you planning on coming along to the Social Sewing this Saturday (the 27th October)? If so, please let me know!

Sunday, October 21, 2012

Great Stuff... #4

I spent quite a few hours this morning catching up on my blog reading (over 300 posts, phew!) so thought it was time to put together another 'great stuff' post...

Enjoy!

Friday, October 19, 2012

Patternmaking Classes - 1&2

I've recently started some patternmaking classes on Monday evenings. They're run at The Dancing Queen in Fitzroy. I've started off with the 6 week "Patternmaking 1" course, which covers the basics of pattern making and we practice the basic principles by making some basic 'unfitted' blocks.

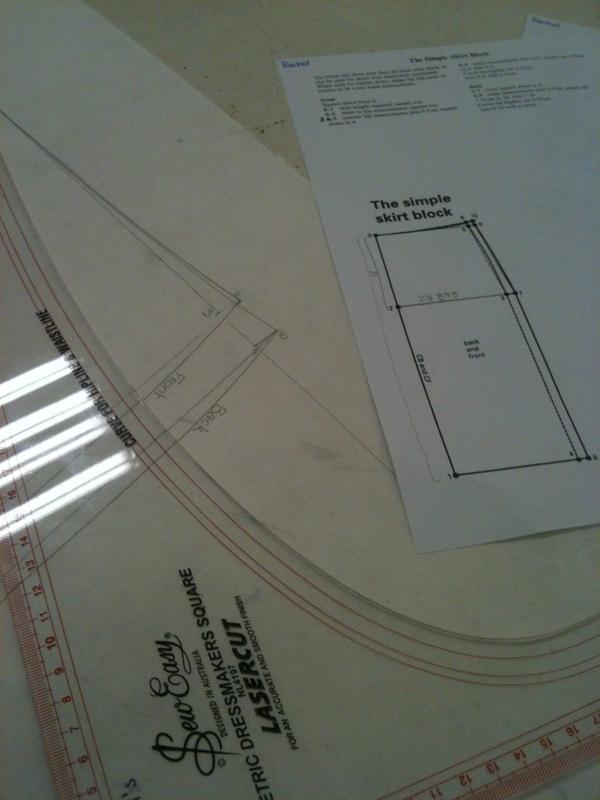
Weeks 1 and 2 have been about drafting a basic "easy fit" skirt block. After spending the beginning of the first session learning about taking accurate measurements, and then taking our measurements in pairs, we set to drafting a very basic straight skirt with an elastic waistband. In the second session we made up toile's of our skirts, and if applicable made alterations.

I was still a little cautious of the course at the beginning as there was quite a lot of discussion of standard sizing, and when we took our measurements we were then asked to pick our closest standard size and make note of our variations from it.

While I'm not interested in making things to standard sizing, but want to make it to my personal sizing, it was an interesting exercise to see how my sizes measure up in relation to the "Australian Standard". Overall I'd probably be a 12, with my bust falling into a size 12, however my hips are a size 16, but my shoulders and arms are off the bottom of the scale (which goes down to a 6) - pear shaped much?!

Thankfully the relevance of the class picked up once we started drafting, as the skirt pattern didn't give any mention to standard sizes' but was purely based off our measurements - our waist, hip and 'waist to hip' measurements to be precise.


After drafting the block we traced it off, added seam allowances and checked the accuracy of our drafting by walking the seam lines - mine was bang on! Hooray! Then it was onto making the toile.

As I would have predicted based on my experiences hemming skirts, my skirt was slightly shorter at the back than it was at the front. While in the past I have just hemmed it so that it sits at an equal height from the floor when wearing it, this isn't really the 'proper' way to do it - especially if you want to use a border print for example. Our teacher Maida told me how to alter the pattern properly - and it's to add extra to the skirt near the bum, rather than at the bottom. You can see my alteration here, my skirt was 1.5cm shorter at the back, so that's how far I spread the pattern, after drawing a diagonal line from the very top of the side seam (as to not interfere with the side seam curve):


You can see my second toile after making the alteration here (sadly I don't have a before pic for comparison):


You'll have to believe me, that now the skirt sits level with the floor at the front and the back.

It's encouraged (but not part of the actual course) to now use our block to make a garment with the pattern to test out our drafting skills properly, but I'm completely at a loss of how to modify this pattern into a design that would be comfortable and flattering and to my style... I'm not usually an elasticated waistband kind of girl!! Any ideas?

Tuesday, October 16, 2012

Social Sewing - October - Are you in?


The next date we've organised for some Social Sewing is less than 2 weeks away, so I thought I'd post up a quick reminder about it.

Here are the details:

  • Date: Saturday 27th October
  • LocationGJs Discount Fabrics, in Brunswick- they have a big workroom with big tables and lots of floor space, power points and light. You would need to bring your own machine. 
  • Time: 9-4 (their opening hours, but you can come for as much or as little of that as you like) 
  • Cost: $10 per person (paid to GJs when you arrive) 

If you could please let me know if you're planning on coming by comment or email so I can keep GJs in the loop as to a vague idea of how many of us to expect.

Please feel free to pass on the information to other Melbourne sewists who might be interested in coming along.

I look forward to seeing you there!

(If you can't make it to this one, there is another one scheduled for the 17th of November as well)

Monday, October 15, 2012

Rooibos - Finished?

This weekend, for what feels like the first time in AAAAGES, but in reality is more like the first time in two weeks, I had the chance to sit down and do some clothes sewing. On Friday evening I got together with some lovely friends for a sewing evening and I made really good progress on my Rooibos dress that I'd cut out at the Social Sewing day.


On Friday evening I managed to get all of the pieces together and the zip in, leaving only finishing the neck and arm holes and the hem, which I did on Sunday morning/lunchtime. I didn't do the facings for the pattern, so I finished the neck and arm holes with bias binding, using Tasia's technique from the Pendrell blouse that I also used on the Portrait Blouse. However, as I had corners on the neckline, I had to add a new skill to my repertoire; bias binding on inside corners. For which I used this very good tutorial on the topic.


I am absolutely thrilled with the fit of this dress, it's the second pattern that I've tried actually doing a FBA on and it worked fantastically (above pic shows FBA in progress). I used the tutorial for the Rooibos FBA on the Colette Patterns blog, starting with the bodice size based off my high bust measurement and adding in about 1". I did however still need to add in some extra fabric at the side seams (when I was making my muslin I used a method very similar to Rachel's "fitting insurance" method) which I was glad I'd done. Once I'd worked out the fit of the bodice pieces, I worked out which midriff pieces to cut based on the  measurement around the bottom of the bodice pieces.


Here's a summary of the fitting changes I made to the dress:
  • Added a 1" FBA to size 4 bodice.
  • Extended the weird stubby back bodice darts about 3" in length.
  • Added 5/8" to the side seam on the front of the bodice.
  • Added 3/4" to the side seam on the back of the bodice.
  • Added an extra 5/8" length to the bottom of the front bodice (and I probably could have added a smidge more).
  • Removed some of the curve in the midriff piece.
  • For the back midriff cut size 8, for the front midriff cut size 6.
  • For the back skirt cut size 8 at the top, tapering down to size 10 8" below the seamline.
  • For the front skirt cut size 6 at the top, tapering down to size 8 8" below the seamline.
  • Pinched out about 1cm from back neckline near shoulder blades, tapering to nothing at the arm hole (see below pic for why).
  • removed the little collar thingy (as I didn't have a nice contrasting fabric, I will include it next time hopefully).
Having now worn the dress for a while, the the only other thing I think I'd change is to make the front arm holes a little bigger as it digs in a tiny bit at some angles.


The fabric I used is a printed poplin that I bought at Spotlight at the beginning of the year. Even after washing it was still quite stiff so I was worried that it wouldn't really work for a dress, so I underlined the fabric with some white voile from GJs that does have lovely drape, which I think has made just that bit of difference. Hopefully it'll continue to soften up as it's washed too.


I wore the dress last night to dinner and then today to work and it's super comfy and hasn't become too obviously creased. The pockets really are fantastic too! However, as the title of this post suggests, I'm not 100% convinced the dress is finished. I'm not usually one for adding trim (I don't think I've ever added any trim to anything I've made), but the design lines of the dress are lost in the busy print, and I think adding something to highlight them would make the dress more interesting and more flattering.


So, while at my pattern making class this evening (more on that soon, I promise!) I bought some relatively simple black trim to try (the flowers are outlined and detailed with black on the fabric so black isn't a stupid choice). I already pinned it onto the dress in the store and think it really improved the look of the dress. So I shall add it on and report back with new pics!


Excluding potential trim additions however, I already love this dress! It's very similar in silhouette to some of my favourite and most worn dresses, and has fantastic pockets! I definitely see some more of these dresses in my future!

Thursday, October 11, 2012

Balcony Garden - Week 5 - Good & Bad

My garden is still going well, and this week I really feel like it "leveled up" as I added little bamboo tee-pee's to the mystery pea and yellow boy tomatoes from Helen. I also bought a Cherry tomato plant and some Thai Chilli seedlings, and planted some more basil, some coriander and some carrots.

The reason for the tee-pees was that the mystery pea plant pretty much doubled in size in a week, appearing to grow about two inches each day - I'd come out each evening and be surprised how much it had grown in the previous 24 hours! Here it is one week apart (from slightly different angles so it's tricky to see, but it's about double the size at least):


However, not everything is going swimmingly, and I was hoping somebody might be able to suggest what's gone wrong here, but my oregano is looking REALLY sad. I noticed last week that about 2/3 of the oregano plant has died, and then today it's looking even worse again. Below are a series of photos of the oregano:


(22nd September)


(30th September)


(4th October)


(7th October)


(10th October)

What have I done to it???! It looks like it was doing fine until I added the mulch, but I thought mulch was supposed to be good the plants?! when I first noticed I stuck my finger in the soil to check they had enough water (although they're in a self watering pot) and it felt relatively dry, so I've been watering from the top rather than just adding water in the bottom like the pot says, but it doesn't seem to have helped. I haven't watered it too much I don't think either. I have fed the plants with seasol seaweed extract at fortnightly intervals (as instructed on the bottle), but surely that's not bad for it?  I've closely examined the other herbs that are in the same tub (Rosemary, Thyme and Sage) and they're all doing great (the thyme in particular is doing really well).

Anyone? Help! Please!
Related Posts Plugin for WordPress, Blogger...