Tuesday, June 12, 2012

Finished: Cambie Dress


I finished my Cambie Dress, and I love it!
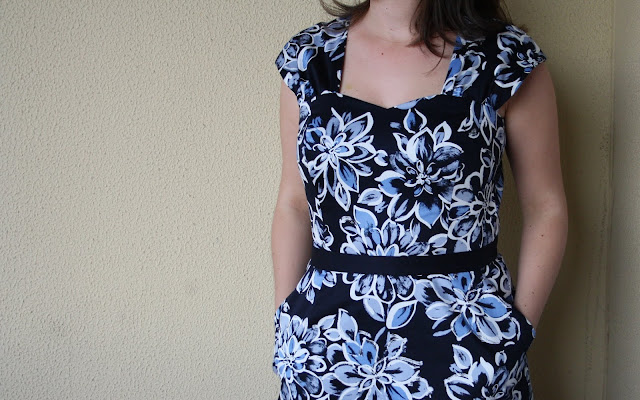


It's tricky to pick my favourite part; the sweetheart neckline, the gathered cap sleeves, the a-line skirt, the pockets... but after careful consideration I think it's the addition of the extra little waistband piece. Since my fabric has some stretch, but the waistband piece is cut so that it doesn't have stretch around the waist it has a nice stabilising effect in a very comfortable dress. Oh, and (I think) it's flattering too.


On top of all those positives about the finished dress, one massive bonus of the pattern itself is how economical it is in terms of fabric usage! As I mentioned before, I had 2.6m of this fabric and I managed to squeeze the pieces into a meager 1.5 metres - pretty good for a dress! (Leaving me a decent size piece left over to make a skirt)


The fabric is a stretch sateen, and I wanted to see if I could find some in a coordinating colour for the waistband - as you can see I found a matching navy (from Clegs).


I used some normal slippery lining fabric to line the skirt.


As I mentioned the other day, despite making a muslin of the bodice there were some fit issues, most likely due to the stretch in my fabric and because I used stretch sateen to line the bodice as well. The bodice was massively gaping through the front neckline.


The fit issues were fixed by extending the stitching line of the darts to convert it into a princess seam. This removed the extra fabric from the neckline. Shown above is the line of stitching I added, you can see the original dart near the top of the photo, and the added line is the curved bit further down. I also shortened the straps slightly at the lower seam.


While I'm pretty sure it was my fabric choices the caused the problems, I'm happy with my choice, as the double layer of stretch sateen gives the bodice a nice structure whilst still being comfortable.

Other than that alteration I didn't deviate from the instructions, which are very clear, and the inside of the zip looks fab! I even took the suggestion from the instructions to sew the waistband down by hand at the end, to make sure it was perfectly lined up. I'm glad I took the time to do that.
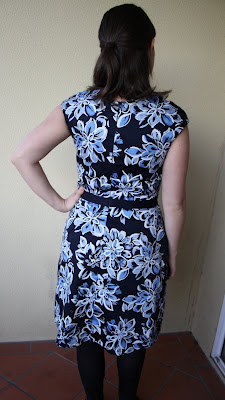
 

Since the flowers are relatively random I didn't bother matching the print, even on the centre back seam or where the pockets are. I think it still looks pretty good. The only print placing I paid attention to was where the flowers would fall on the bodice front.


Since I had already cut out waistband pieces in the print before I bought the navy solid I decided to use one of the space waistband prints on the inside - nobody will see it but it makes me smile. It also makes me think that this dress would look pretty awesome in a solid with a contrast waistband!


So in summary of a particularly picture heavy post - I love this dress! I definitely need quite a few more!


(Thanks Misaya for taking the photos!)

Monday, June 11, 2012

Fabulous Sewing Day

Yesterday I got together with a few friends for a very enjoyable sewing day. Just like our weekend away there was lots of sewing done and even more laughter had.


Do you get together with friends for sewing? If not, I highly recommend it. In fact, if you're in Melbourne you're more than welcome to join us, just let me know if you're interested.

Sunday, June 10, 2012

Cate Parr Prints...

Last year I discovered Silver Ridge Studio on etsy. Cate Parr is an amazing artist who is selling originals and prints of some beautiful watercolour paintings. I wanted to get some of the prints back then, but at the time I was living in a bedroom in the roof-space and as such didn't have any walls to hang things on. Thankfully I have now moved and have walls so I'm re-visiting the idea.


I spent quite a lot of time yesterday looking through all the prints and liked far too many of them. I have now narrowed them down somewhat, but here are some of my favourites that didn't quite make the cut:


I think I've narrowed it down to two sets of three (think being the operative word).

Option 1:


Option 2:


Which would you choose?

Saturday, June 9, 2012

Three Years Young


On this day, the 9th of June, three years ago I posted my first ever blog post on this little blog. It has been an amazing three years; posting about my various projects, celebrating the successes, comiserating the failures and learning heaps. I'd like to take this moment to thank every single one of you reading this for your enthusiasm and support, particularly your encouraging comments and advice.


I have something exciting planned to celebrate my "blogiversary", but unfortunately I can't post it quite yet so the celebrations will be slightly belated, but stick around as I'm super excited about it!


(Since I surrounded my first post with some project highlights, I thought I'd do the same here with some of my favourite projects from the last year or so)

Thursday, June 7, 2012

Ironing Board Make-Over

Thanks for the comments on cameras the other day, if anybody has any other suggestions they'd be gratefully received, I'm going to go have a look at cameras in some shops on the weekend and see if that helps work out what I want. However, today I have a finished item to share!

This project was added to my to-do list back in February when Randi at I have to say... announced that her February sew-along would be an ironing board cover. My ironing board cover was starting to look very sad; fading, scorch marks and the pad was in a pretty sorry state letting the grid of the board come through...


I used some furnishing weight fabric that I bought at Ikea a while back and mostly followed Randi's tutorial, but because my fabric was heavier than Randi's I didn't fold over the fabric twice, I finished the edge with a zig-zag and folded it once. Because of this I cut the fabric 3" bigger than the board rather than the suggested 4".


I also made a new pad for the ironing board with two layers of some left over cotton batting. My old pad had actually slid across slightly and wasn't centred on the board under the cover, so this time I decided to try something new - I've stitched the pad to the cover with a line of basting stitches just inside of the line of stitches for the casing for the cord. This also means that my pad goes around the edge of the board, which I think might be useful too. (if that doesn't make sense please let me know and I can take some pictures)


This project took a couple of hours, tops, and I'm glad that I finally got around to doing it.

Tuesday, June 5, 2012

Cameras

I think it is time to invest in a new camera. I bought my current camera in 2004, so it's done me very well, but it's starting to get a bit old. The battery goes flat very quickly and I'm finding my photos limited by what I'm able to make it do (particularly inside shots). So, I am asking for some advise or suggestions when it comes to cameras these days.


The only problem is, I have no idea what I want, I just know I want to take better pictures. My current camera is VERY limited in low light situations and taking photos outside, and the flash really washes things out. Most of my photos are taken for my blog, so photos of finished garments and quilts, and detail and in progress shots. Realistically a lot of the photos will be taken inside, which I know isn't ideal but is the way things are. I'd also like to take more photos of other things too though, which having a nicer camera might help with.

What camera do you have? Do you like it? Would you recommend it? Do you know of another one you'd recommend? Any advice gratefully recieved!

Monday, June 4, 2012

Sewing Lessons - part 3

The other evening Misaya came over for another sewing date to work on her quilt.


She promptly got to work finishing off her lines of quilting, which were triumphantly completed very quickly


Then onto the scary stage of trimming the quilt top...


... ready to attach the binding...


...including learning how to do mitered corners.


Now all the machine sewing is done - just a bit of hand sewing left and it'll be finished!

Saturday, June 2, 2012

Coming to England!!

I am starting to get incredibly excited, because in July I am coming to England!! I'm heading across for two weddings, that I'm even more excited for, in between which I will be visiting people ALL over the country. Which leads me onto the point of this post... fabric shopping in England.

My interest in sewing increased as I was leaving England, so my knowledge of sewing shops over there is extremely limited, so I was hoping for some suggestions/recommendations for while I'm there. More importantly I'll have stacks of room in my suitcase coming home as a fair bit of what I'm taking across isn't coming back with me.

I'll be visiting a few places, including Birmingham, Bristol, Macclesfield and Cornwall. Does anybody have any suggestions for places to visit for some sewing related fun/shopping in (or near) those areas? Better yet, if anybody in any of those areas is interested in catching up please let me know, it would be really exciting to meet fellow bloggers/sewing enthusiasts!

4 weeks to go!!! :D

Friday, June 1, 2012

Lesson of the Week...

... if your fashion fabric has stretch in it, it's kind of pointless to make a muslin out of non-stretch fabric...


Due to some major gapage in the neckline, I think the bodice of my Cambie dress is going to have to become a faux princess seamed dress...

Wednesday, May 30, 2012

Naughty Sewing

Last night I did some "naughty sewing". You know the kind? When you have something that you should be working on, but instead you are doing something you want to do (partly because you know you should be doing something else).


My naughty sewing last night was starting on a Cambie Dress. After whipping up a quick muslin to check the fit I cut out my fashion fabric. Do you recognise it? It's the fabric I talked about in this post. After some fiddling with the cutting layout I managed to cut the Cambie dress out of a scant 1.5m, leaving about 1.1m left to make the coveted pencil skirt that was the outcome of that previous post.

I think a trip to buy lining and a zip is in order in my lunchbreak tomorrow...
Related Posts Plugin for WordPress, Blogger...