I got a subscription to Audible for my Birthday, but I'm completely overwhelmed and have no idea what audiobooks to get. So I was hoping someone might have some suggestions.
So far I've gotten a fair few audiobooks out the library, ranging from trashy "chick lit" to some non-fiction stuff, so am open to a range of different things. Basically I'm after anything that's easy to listen to, but interesting, but doesn't require too much thinking.
So, does anyone please have any suggestions?

Tuesday, January 31, 2012

Saturday, January 28, 2012
Beignet Muslin, and Super Oops!
Thusday this week was Australia Day, which means a day off work, hurrah! After a lovely picnic in the park with some friends, me and Claire went back to her house to work on our Beignet muslins. She had already traced her pattern pieces and made a muslin, but I hadn't started at all.
I decided to have a go at grading between sizes on the pattern, because my waist and hip measurements fell across two different sizes. So when tracing the pieces I traced a 12 for most of the skirt, but a 10 at the waist, and joined up between the two over the three inches above the "lengthen/shorten" line marked on the pattern.
I then cut out just the pattern shell pieces from some poplin to make a muslin, stitched up the seams and pinned where the buttons should be, and horror of horrors, it was WAAAAAY too big, as shown on the left below *insert sad face here*


After having a bit of a look at the muslin, I decided that I could pinch out the extra full-ness in the centre back, so did a quick seam up the centre back taking out a whopping 6cm(!!). Lots of cursing about stupid sizing was performed, but after that alteration the skirt fit pretty much perfectly (see above, right). My grading has left a slight bump on the front between the centre front and side front pieces, which I will smooth out, but other than that the skirt fits great.
However, before you start thinking that Sarai doesn't know what she's talking about please keep reading....
Look at what I noticed on my centre back pattern piece when I was folding it up to put it away:

Yup, that's right, I hadn't cut out the pattern piece along the "cut on fold" edge. I had just left it thinking "oh I don't need to cut there, I can just line up the line with the fold when I cut it out" but then had proceeded to completely forget that part and lined up the fold with the edge of the paper. And guess what, that extra bit of paper is pretty much exactly 3cm (ie 6cm extra fabric!)
Oops! Sorry Sarai for cursing at your pattern drafting, there is nothing wrong with it at all, it fits perfectly, it was 100% operator error!
So the morals of this story?
1) Don't be lazy when you're cutting out your pattern pieces
2) Pay attention when you're placing pattern pieces and cutting them out
3) The Beignet so far seems to have a fantastic fit, and the envelope measurements are pretty much spot on.
I decided to have a go at grading between sizes on the pattern, because my waist and hip measurements fell across two different sizes. So when tracing the pieces I traced a 12 for most of the skirt, but a 10 at the waist, and joined up between the two over the three inches above the "lengthen/shorten" line marked on the pattern.
I then cut out just the pattern shell pieces from some poplin to make a muslin, stitched up the seams and pinned where the buttons should be, and horror of horrors, it was WAAAAAY too big, as shown on the left below *insert sad face here*
After having a bit of a look at the muslin, I decided that I could pinch out the extra full-ness in the centre back, so did a quick seam up the centre back taking out a whopping 6cm(!!). Lots of cursing about stupid sizing was performed, but after that alteration the skirt fit pretty much perfectly (see above, right). My grading has left a slight bump on the front between the centre front and side front pieces, which I will smooth out, but other than that the skirt fits great.
However, before you start thinking that Sarai doesn't know what she's talking about please keep reading....
Look at what I noticed on my centre back pattern piece when I was folding it up to put it away:
Yup, that's right, I hadn't cut out the pattern piece along the "cut on fold" edge. I had just left it thinking "oh I don't need to cut there, I can just line up the line with the fold when I cut it out" but then had proceeded to completely forget that part and lined up the fold with the edge of the paper. And guess what, that extra bit of paper is pretty much exactly 3cm (ie 6cm extra fabric!)
Oops! Sorry Sarai for cursing at your pattern drafting, there is nothing wrong with it at all, it fits perfectly, it was 100% operator error!
So the morals of this story?
1) Don't be lazy when you're cutting out your pattern pieces
2) Pay attention when you're placing pattern pieces and cutting them out
3) The Beignet so far seems to have a fantastic fit, and the envelope measurements are pretty much spot on.
Friday, January 27, 2012
Super Stippling Progress
After my Free Motion Practice post the other day I started quilting my concentric hexagons quilt (which really does need a better name, suggestions please?) and I thought I'd share my progress.

Since the weather has been pretty hot here this week I sought sanctuary of the living room, as my room can get very hot in summer and the living room has air con. However, we currently don't have a dining table, so I set myself up in a very unconventional and probably highly un-ergonomic setup using my coffee table.

I used the coffee table, a stool and the couch to support the weight of the quilt so that it wasn't pulling on where I was stitching. Then as always I always do whatever type of quilting I'm doing, I started close to the middle and worked my way out.

Despite the unconventional setup I am pretty happy with how my stitching is working out.

It also looks pretty good on the back (see below). Since the print is quite busy already and the navy bits alerady have some beige lines it actually (surprisingly) sinks into the print quite well and looks alright.


I did maybe 1/4 of the quilt over the course of the evening, which was 3 or 4 bobbins worth of thread I think.

You can see above how much I have done so far. I started up the top, and worked my way around a bit in the middle then moved across to one edge, then back across to the middle then kept kind of wiggling my way out until I reached the corner and then started working across the bottom edge.

I'm planning to take this along to the MMQG Sit and Sew Evening tonight to make some more progress on it.
And just so you don't think that everything always works perfectly, here's some stitching that went wrong:

This happened straight after I re-threaded the machine after the first bobbin ran out. I stitched maybe 6-10" of stippling and noticed that the stitches looked a bit loose. Then when I looked at the back of the quilt I had these terrible loops happening. Not good! So I stopped, unpicked the bad stitches (which thankfully was very easy) and completely rethreaded the machine, which fixed the problem.
So, if you ever end up with funny stitches, the best course of action is to re-thread your machine, as that usually fixes the problem
Since the weather has been pretty hot here this week I sought sanctuary of the living room, as my room can get very hot in summer and the living room has air con. However, we currently don't have a dining table, so I set myself up in a very unconventional and probably highly un-ergonomic setup using my coffee table.
I used the coffee table, a stool and the couch to support the weight of the quilt so that it wasn't pulling on where I was stitching. Then as always I always do whatever type of quilting I'm doing, I started close to the middle and worked my way out.
Despite the unconventional setup I am pretty happy with how my stitching is working out.
It also looks pretty good on the back (see below). Since the print is quite busy already and the navy bits alerady have some beige lines it actually (surprisingly) sinks into the print quite well and looks alright.
I did maybe 1/4 of the quilt over the course of the evening, which was 3 or 4 bobbins worth of thread I think.
You can see above how much I have done so far. I started up the top, and worked my way around a bit in the middle then moved across to one edge, then back across to the middle then kept kind of wiggling my way out until I reached the corner and then started working across the bottom edge.
I'm planning to take this along to the MMQG Sit and Sew Evening tonight to make some more progress on it.
And just so you don't think that everything always works perfectly, here's some stitching that went wrong:
This happened straight after I re-threaded the machine after the first bobbin ran out. I stitched maybe 6-10" of stippling and noticed that the stitches looked a bit loose. Then when I looked at the back of the quilt I had these terrible loops happening. Not good! So I stopped, unpicked the bad stitches (which thankfully was very easy) and completely rethreaded the machine, which fixed the problem.
So, if you ever end up with funny stitches, the best course of action is to re-thread your machine, as that usually fixes the problem
Tuesday, January 24, 2012
Free Motion Practice
Today's post is related to yesterdays post about my hexagon quilt. Before jumping in and quilting the queen sized quilt (gulp!) I thought some practice to get my hand back in with Free motion quilting as I haven't done any in a while. So I got a practice sandwich, loaded up my machine with different colours for the top and bobbin thread and went quilting.

I was quite happy with how it turned out. I definitely need to work on keeping my stitch length a bit more even, but I was also focusing on increasing my scale slightly and keeping it consistent, which I think I managed quite well.

Leah Day, of the Free Motion Quilting Project is currently running a free motion quilt along where she is encouraging readers to jump in and just give it a go. She's written some great posts of how to get started, including some really great tips, one of which I used here with great success. In her "playing with scale" post she talks about using a reference to help you with changing the scale of a design. When I've free motion quilted things before I've struggled with scaling up the stippling, and I used Leah's tip of using a touchstone to remind you of your scale - I used the width of my fingers as I could always see it. I aimed for the gaps between the quilting to, on average, be about the width of my finger, which they are, hurrah!
(Leah has also been encouraging readers to show pictures of their stitches, both good and bad, so that's what I've done)

I definitely can improve, in the above pic you can see some examples of what I want to improve on - near the top you can see a massive variation in stitch length, and below left you can see how I need to practice smoothing out my curves sometimes.

Flipping it over and looking at the back it's mostly ok, as shown above...

But occasionally I get some of the top threads coming through to the back. This was alleviated somewhat by increasing the upper tension a tiny bit (and I mean tiny). Again however, Leah has covered this too and has suggested making sure you go slow and steady on the curves - as if you notice it only happens on the tighter corners where i'm not going at a steady speed.
Another thing that Leah recommends is to use the same thread in the top and bottom, which agrees with Michele's comment on my last post. I don't want to have navy thread poking through to my lovely cream negative space, and I don't think the cream thread will look horrific on the back (and besides, it's the back!)
Now to fill up some bobbins and get quilting!!
I was quite happy with how it turned out. I definitely need to work on keeping my stitch length a bit more even, but I was also focusing on increasing my scale slightly and keeping it consistent, which I think I managed quite well.
Leah Day, of the Free Motion Quilting Project is currently running a free motion quilt along where she is encouraging readers to jump in and just give it a go. She's written some great posts of how to get started, including some really great tips, one of which I used here with great success. In her "playing with scale" post she talks about using a reference to help you with changing the scale of a design. When I've free motion quilted things before I've struggled with scaling up the stippling, and I used Leah's tip of using a touchstone to remind you of your scale - I used the width of my fingers as I could always see it. I aimed for the gaps between the quilting to, on average, be about the width of my finger, which they are, hurrah!
(Leah has also been encouraging readers to show pictures of their stitches, both good and bad, so that's what I've done)
I definitely can improve, in the above pic you can see some examples of what I want to improve on - near the top you can see a massive variation in stitch length, and below left you can see how I need to practice smoothing out my curves sometimes.
Flipping it over and looking at the back it's mostly ok, as shown above...
But occasionally I get some of the top threads coming through to the back. This was alleviated somewhat by increasing the upper tension a tiny bit (and I mean tiny). Again however, Leah has covered this too and has suggested making sure you go slow and steady on the curves - as if you notice it only happens on the tighter corners where i'm not going at a steady speed.
Another thing that Leah recommends is to use the same thread in the top and bottom, which agrees with Michele's comment on my last post. I don't want to have navy thread poking through to my lovely cream negative space, and I don't think the cream thread will look horrific on the back (and besides, it's the back!)
Now to fill up some bobbins and get quilting!!
Monday, January 23, 2012
Basted Hexagons
I have made great progress in the "concentric hexagons" quilt project I started a while ago using the pre-cut fabric kindly gifted to me. I had made up all the half hexagons at my retreat back in November, and I took them with me to Perth at Christmas to work on the final layout of the quilt. While I was there I stitched together the half-hexagons into rows, and at the MMQG SASD I stitched the rows together and the borders around the outside... except when I got home I realised that I had put the borders on the wrong edges, and rather than making the quilt square had succeeded in making it more rectangular! oops! I spent some time this evening unpicking the borders and re-sewing them back onto the correct sides, and thus finally finishing the quilt top:

I had decided for this project to challenge myself to try and make something with a modern aesthetic despite using the very traditional styled fabrics. The key to my "vision" was negative space, which was filled perfectly by some homespun from spotlight in pretty much exactly the same colour as the solid cream in the range.
What do you think? Am I on course for making a "modern" quilt from the "traditional" fabrics?
One of the fat quarters had the name of the range on the selvage, which meant that I could look it up and managed to buy some on the internet from Lonestar Quilting for the backing and borders. The range is Wiscasset by Moda, and I chose this large "cheater quilts" print for the backing, because I quite like the print and it was completely lost having been cut up for the hexagons. I particularly like how it's got several of the prints from the line within its design.

After finishing the quilt top, the rest of my evening was spent basting the quilt (in the sanctuary of my air conditioned living room). I intend to machine quilt this one, so I had intended to spray baste it, but forgot to buy more spray. Since I had the evening free, rather than wait until I have some spray I decided to pin baste it instead. Hopefully the pins won't be too much of a pain when it comes to the machine quilting (I'm planning to free motion quilt it), I've only used pin basting for hand quilting so far.

Lastly, I'd please like some opinions on what colour bobbin thread to use when quilting. I have some cream that matches the solid for the top, and was probably thinking Navy for the bobbin (ie back). The tension when quilting is pretty good on my machine, so it's unlikely to show through to the front but it's possible.... What would you use?
I had decided for this project to challenge myself to try and make something with a modern aesthetic despite using the very traditional styled fabrics. The key to my "vision" was negative space, which was filled perfectly by some homespun from spotlight in pretty much exactly the same colour as the solid cream in the range.
What do you think? Am I on course for making a "modern" quilt from the "traditional" fabrics?
One of the fat quarters had the name of the range on the selvage, which meant that I could look it up and managed to buy some on the internet from Lonestar Quilting for the backing and borders. The range is Wiscasset by Moda, and I chose this large "cheater quilts" print for the backing, because I quite like the print and it was completely lost having been cut up for the hexagons. I particularly like how it's got several of the prints from the line within its design.
After finishing the quilt top, the rest of my evening was spent basting the quilt (in the sanctuary of my air conditioned living room). I intend to machine quilt this one, so I had intended to spray baste it, but forgot to buy more spray. Since I had the evening free, rather than wait until I have some spray I decided to pin baste it instead. Hopefully the pins won't be too much of a pain when it comes to the machine quilting (I'm planning to free motion quilt it), I've only used pin basting for hand quilting so far.
Lastly, I'd please like some opinions on what colour bobbin thread to use when quilting. I have some cream that matches the solid for the top, and was probably thinking Navy for the bobbin (ie back). The tension when quilting is pretty good on my machine, so it's unlikely to show through to the front but it's possible.... What would you use?
Sunday, January 22, 2012
Getting the stash under control
Along with organising my patterns, I also wanted to organise my fabric stash for the new year, particularly given that the stuff I'd bought or gotten out recently had ended up just being stacked on top of my dresser:

Here is my current stash of non "scrap" dress making fabric:
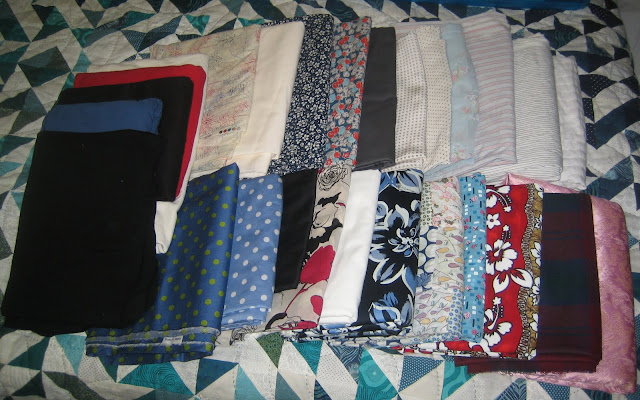
Most of it I know what I want to do with it. The jersey down the left needs to become t-shirts. Then along the back row left to right I have a pleated skirt and it's lining, a rooibos, a jasmine, a beignet, the next three some kind of blouses, and the last three shirts. The front row the left spots will become dresses, the next three a dress and it's lining and contrast, but the last ones I have mostly inherited and I don't know what to do with yet, so any suggestions gratefully taken.
Anyway, I am determined to make a dent in it before buying any more (linings etc to finish stuff with this fabric is excepted!). How's your stash looking?
Here is my current stash of non "scrap" dress making fabric:
Most of it I know what I want to do with it. The jersey down the left needs to become t-shirts. Then along the back row left to right I have a pleated skirt and it's lining, a rooibos, a jasmine, a beignet, the next three some kind of blouses, and the last three shirts. The front row the left spots will become dresses, the next three a dress and it's lining and contrast, but the last ones I have mostly inherited and I don't know what to do with yet, so any suggestions gratefully taken.
Anyway, I am determined to make a dent in it before buying any more (linings etc to finish stuff with this fabric is excepted!). How's your stash looking?
Thursday, January 19, 2012
Pretty Colette
I went in with some friends to get some Colette patterns, which arrived while I was away over Christmas. We got the Lady Grey, Crepe, Beignet, Jasmine and Rooibos:

I got the Beignet, Jasmine and Rooibos, and have actually already got fabric for them. This is what I got:

The Beignet is a grey drill, the Jasmine a voile/lawn and the Rooibos a poplin (all from Spotlight)
I can't wait to get started on them!
I got the Beignet, Jasmine and Rooibos, and have actually already got fabric for them. This is what I got:
The Beignet is a grey drill, the Jasmine a voile/lawn and the Rooibos a poplin (all from Spotlight)
I can't wait to get started on them!
Tuesday, January 17, 2012
A Pair!

Today I finished my first pair of socks!!!

Not really the ideal day to finish them, given that it was 34 degrees here today, but my office is over-air-conditioned, so I still got to wear them this afternoon :)

I am SO happy with how they turned out! There's a few small mistakes in them (which i'm not going to point out to you) but in general they're really successful.

I'm already eager to start my next knitting project. I'm going to knit some socks with one of my friends from work, so yesterday we went into the city and bought some yarn for them. We're planning to cast on in our lunch break tomorrow... just as soon as I choose which pattern I'm going to use!
Monday, January 16, 2012
Don't you just love sales?
I got some good bargains in the sales around Christmas and New Year. The best has to be this white quilting homespun that I got from spotlight:

I bought what was left on the bolt, which was 6.2m, and after 30% off and a $10 voucher it only cost $20, score!!
I have some very exciting but even more secretive plans for this fabric, I promise I'll share as soon as it's no longer a secret though.
I bought what was left on the bolt, which was 6.2m, and after 30% off and a $10 voucher it only cost $20, score!!
I have some very exciting but even more secretive plans for this fabric, I promise I'll share as soon as it's no longer a secret though.
Friday, January 13, 2012
Great Op-Shop Find
While I was in Perth for Christmas I snagged this pattern in an op-shop for only 50c!! Isn't it great! It's about one size too small for me, but surely it can't be too hard to make it a bit bigger.

The envelope back suggests to make it in "Garbadines, Linens, Piques, Poplins, Denims, Twills". What fabric would you use to make it up?
The envelope back suggests to make it in "Garbadines, Linens, Piques, Poplins, Denims, Twills". What fabric would you use to make it up?
Subscribe to:
Posts (Atom)
