Friday, April 20, 2012

Tutorial: Pyjama Pockets! - Part 1

After buying my PJ fabric last weekend I told my friend Claire that I'd put together a tutorial for how I add pockets to my pyjamas.

You're probably thinking at this point why on earth would I add pockets to my pyjamas, but personally I think once you've had some with pockets you never go back!

Now granted, I don't just use my PJs for sleeping, I often wear my pyjama bottoms around the house if I want something comfy to wear and a pocket for my phone and such is very handy. I'm also a self professed pocket addict - if I can add pockets to something I will, so it was inevitable really.

The first pair with pockets I made had in seam pockets in the side seams, which was good but found the pockets bunched a bit. Since then I have added "slash" pockets (is that the right term?) to all my pairs and have slowly refined the size that I prefer.

Anyway, in keeping with the PJ theme in the blogosphere at the moment I thought I'd  speed up getting the tutorial written. I've decided to make my tutorial into two parts - first drafting pockets for your pattern, and secondly how to sew them up.


To add this type of pocket you will need to have a pattern that has a side seam down the outside of the leg. If your pattern is all one piece like Karen's you either can't make the pockets the way I do, or you'll need to add a side seam. You'll also need to use a separate waistband piece rather than just folding over the top of the leg piece for the elastic/drawstring casing, or it can get a bit bulky where there are extra layers for the pockets.

Drafting the pockets


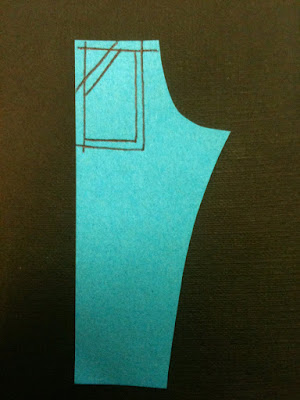
Lets get started! You'll need your front leg pattern piece. Here is my little fake pattern piece made from a post-it to show you the steps:


Next measure in from the edge the distance of your seam allowances to mark the stitching lines along the top and upper section of the side seam:


Now you need to mark the diagonal line of the top of the pocket. I have found that I like my pocket opening to be about 5.5-6" wide. So I draw a diagonal line that is that long between the marked stitching lines - about 3" across and 5" down:


Next we will mark how big the pocket will be. I've made the mistake of making some waaay too small in the past but think I've now settled on a good size of 6" x 8.5". That's a good size for me. When I made the PJ bottoms for the boy he requested REALLY BIG pockets and I made them 7" x 10", which was basically the size of an A4 piece of paper.

Measure the pocket dimensions you want and mark them onto the pattern piece:


Then go around the lines you just drew and add seam allowances on to the bottom and central side of the pocket and above the diagonal line:

Now we need to cut the extra pattern pieces we need for the pocket. First we'll cut the back of the pocket, which is essentially a big rectangle, possibly with a slightly different shape along the top depending on the shape of your pattern piece (mine slope slightly down towards the centre front). To do this, trace around the top and outside edge of your pattern piece, and then along the side and bottom of the pocket (including seam allowance) that you have drawn onto the pattern piece:


As this piece is probably almost a rectangle, I strongly suggest marking the direction/top of the piece. Also label it as "Pocket back", and add other labels such as the seam allowance size, grain line and how many to cut (2).

Next cut along the upper/outside diagonal line on the pattern piece, cutting a triangle off the corner as shown:


Now repeat the process of how you traced the first pattern piece for the pocket except this time the rectangle will have a corner chopped off. You can do this either exactly the same way as before. Alternatively. a slightly easier way is to copy the pocket piece you made before, place it under the PJ front pattern piece, lining up the top and the edge, and then copy off the line to cut the corner off:


This is your "inside pocket" piece. Again I suggest labelling it up like the other one, you'll need to cut two of this one too.

You should now have three pattern pieces where you once had one:


They go in the order pocket back, inside pocket, PJ Front as shown:


I hope that all makes sense. If you have any questions please ask them in the comments and I'll do my best to answer

Stay tuned for the second part of my tutorial, which will cover how to sew them together into pyjamas.

EDIT: Find part two here

Wednesday, April 18, 2012

AQC 2012

This past weekend I spent a few enjoyable hours at this years AQC (Australasian Quilt Convention). As I did last year, I thought I'd share some pictures of my favourite quilts on display:

(click on the photos to see them larger, apologies for the quality, photos were all taken on my iphone)

This design reminds me of a kalidescope of some kind:


This brightly coloured one had some gorgeous coloured quilting that really added to the quilt:

This was a disapearing 9 patch with some gorgeous japanese fabrics, but I particularly liked the borders:

There were quite a few quilts that I was drawn to made of these pieced 1/4 circles and circles. Does anybody know if these designs have a name?

This one was completely hand sewn - piecing and quilting. The quilting in the borders added an amazing texture, and the blocks looked great:


This quilt, that was essentially made of HSTs was lovely:

How cool is this guy (I actually saw a pattern for this on sale, but I don't remember which stall):

This quilt was made of silk so had a lovely sheen that really set off the beautiful quilting:

The background "Tiles" on this mini quilt create such a unique effect:

At first I thought the curved lines around the inside of the circle were ricrac, but on closer inspection I saw that it was embroidery floss twisted through a running stitch. Beautiful effect:

Amazing use of black and white:

How cute are these little guys:

And I saved my favourite for last:

This one was a black wholecloth quilt that had then been painted with metallic paints and then quilted. The skill was just awe-inspiring, the combination of painting and stitching was so precice that It took me a while to realise that it was infact a wholecloth quilt! Amazing, really amazing.

Friday, April 13, 2012

Perfect timing!

It turns out my purchase of PJ fabric was perfectly timed, as there is a Pyjama Party being hosted by Karen of Did you Make That.


Maybe you should join in with the Pyjama Party too! the Pyjamas are due to be revealed on the 28th of April.

Sunday, April 8, 2012

Dress vs separates...

The other day I got a newsletter from Pepperberry with a sample of their new range for this season. One item that particularly caught my eye was their "leaf print dress" (pictured below). It reminded me how much I loved Tilly's Autumn Maples Skirt and had been wanting a pencil skirt with a print for a while.


I looked at it further and realised that it's a dress, which made me go "hmm", and I pinned it and thought no more of it for a while. Then when I got my digest email from pinterest and saw how many people had re-pinned it I was reminded of it, so started thinking about it again.

In the meantime, due to the easter weekend I'd gotten out my fabric stash and had a look through looking for inspiration so the fabric I have was near the front of my mind. Last night I suddenly put two and two together and realised that I already have some fabric that might be perfect for a pencil skirt made out of a print.


I have 2.6m of this fabric. It's a sateen with a tiny bit of stretch that I bought in New York but never really knew what I was going to make out of it. I figure the piece is big enough to make a pencil skirt and the remaining fabric still be big enough to still make something from it. (Although that does raise the question of whether the print is too distinctive to have two garments made out of the same fabric...?)

The big question is, do I just make a pencil skirt, or do I get some solid sateen and make it into a dress like in the inspiration picture above?

I'm not sure what I think about dresses like that that look like a skirt/top combo but are actually a dress. In the past I've always thought them a little limiting as you don't have the option of making a different outfit from it. But then when I think about it, a lot of my skirts I just wear the same outfit over and over again. A prime example of this is my first Crescent skirt, which I pretty much always wear with a black t-shirt and a red cardigan. However, the key phrase there is "pretty much always", not "always". I have the option of wearing it with other things (and will when I finally get around to making a red t-shirt with the red jersey I have stashed). However, the lovely princess seamed bodice of this dress looks so smart compared to a t-shirt....

Another pic with a spool of thread to show the scale of the flowers

My thoughts are going to keep going round and round in circles if I keep on like this, so I'm hoping for some input please...

What would you do?

Saturday, April 7, 2012

Pyjamas!

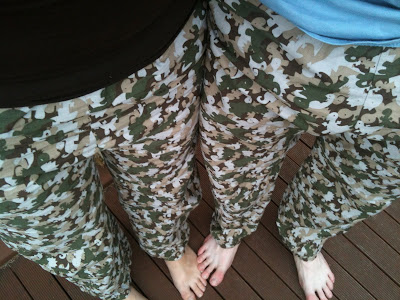
Easter weekend means sales at the fabric stores, so this afternoon me and Claire popped across to Spotlight as they had 40% off all fabric. I have been in need of some new PJs for a while, especially since I was generous and used half of the dinosaur camo fabric to make a second pair for the boy rather than a pair for myself.


I was very restrained, and only bought what I went for. I bought three pieces of fabric, which totalled about $30 including elastic, so $10 a pair of PJ bottoms isn't bad. The birds are flannelette, and the spots are poplin. Once they're made up I'll be able to get rid of some that are getting very very sad!

Sunday, April 1, 2012

New Wallet!

I'm back! I'm all moved and settled in and starting to get back into a rhythm, and so I have something to share again... a new wallet!

Our finished wallets!

This past Friday at the MMQG Sit and Sew Evening Bek agreed to teach me and Jocelyn how to make wallets. You see, she had made a beautiful one before but was talking about replacing it, and very kindly agreed to save making one for a sit and sew so we could join in too. It turns out the tutorial that she followed is very well written and we didn't really need teaching, but it was nice to have the moral support!


Now due to how much we all natter on at the sit and sews we didn't quite get them finished on Friday night, so the girls popped over to my flat this evening to finish them off. We all squeezed around the tiny little table I currently have (see above)(which was ok since wallets are small) and finished them off pretty quickly.

The inside of Jocelyn's wallet

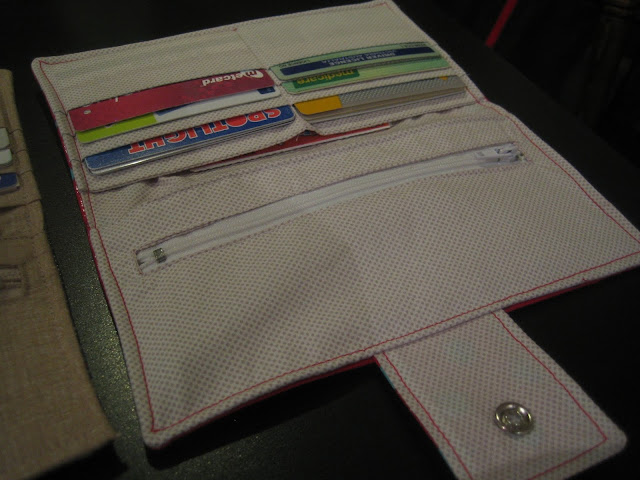
The inside of my wallet

The inside of Bek's Wallet

We couldn't find the tool kit to use a hammer to put in the snaps, but it's ok, we improvised!


The girls both used some spotty Oil cloth that Bek had for the outside of their wallets, but I tried something different. I used some regular quilting cotton (some Japanese stuff my Gran had given me) and some iron on Vinyl that I bought at GJs. It is a bit like sticky back plastic for fabric and seems to be pretty good. It ironed on really well, I had no issues at all with any bubbles or puckers or anything. I'm not 100% sure how hard wearing it'll turn out to be, time will tell on that.

Left to right: Jocelyn's, Mine, Bek's

One thing that came up when we were sewing that I thought I'd share was something to do with the 1/4" foot that comes with many machines. Below is pictured my 1/4" foot. (Now ignore the black guide along the right hand side of the foot, I know that some people detest it and rip it off) The part of the foot I want to talk about is the left hand side.


Do you see the three little lines along the left hand side of the foot? The middle one is level with your needle, and the other two are 1/4" in front of and behind the needle. This is really handy if you need to stop your stitching line 1/4" before or after a point, for example 1/4" before the edge of the fabric when you're about to turn a corner.

The girls hadn't registered those lines on their feet, so I thought I'd share about it on here too incase anyone else hadn't seen it. My foot is for a Janome, does anybody know if there are similar markings on feet for other machines? Had you spotted those lines on your foot? Are there any similar tips for other feet that you know of?
Sunday, March 11, 2012

Dinosaur Camo Pants!

Do you remember the dinosaur camo fabric that I got a while back?


Well, I made the intended dinosaur camo pants out of it for the boy for Christmas I just hadn't had a chance to share them.


I traced off the shape of some scrubs trousers that I have to make a pattern, and added pockets (I was briefed to make the pockets big, so I made them the size of an A4 piece of paper, and was told they were too small, go figure!)

I have since made a second pair, with some minor modifications. Not entirely selfless though, as it means I can steal a pair if I need something to lounge around in :) It's not too sad to be wearing matching PJ bottoms is it?


Lastly, a quick note on my blogging activity - you may have noticed that posts around here have been a bit thin on the ground lately. That's due to a combination of working on things that I can't share on here yet, and also my life being a bit crazy busy at the moment (I'm moving soon, exciting!). Hopefully things will be back to normal around here in a few weeks time.
Related Posts Plugin for WordPress, Blogger...